Manuals
Hoe stel ik een Gradebook in met de Grades Setup Wizard voor de eerste keer?
Wat is een Gradebook?
Een ‘Gradebook’ is een overzicht van de cursusresultaten van de studenten. Na het maken van een ‘Gradebook’ kan je hier ‘Grade Items’ aan toevoegen. ‘Grade Items’ vertegenwoordigen alle taken en activiteiten die je wilt beoordelen binnen een cursus.
Wat is de Grades Setup Wizard?
Door de ‘Grades Setup Wizard’ te gebruiken kun je een ‘Gradebook’ maken. Hier kun je de ‘Gradebook’ zelf inrichten naar eigen voorkeur.
Aan de slag met de Grades Setup Wizard
Om bij de ‘Grades Setup Wizard’ te komen moet je klikken op ‘Grades’, vervolgens klik je in de balk eronder op ‘Setup Wizard’.

Als je op de pagina van ‘Grades Setup Wizard’ bent, kun je naar beneden scrollen om op ‘Start’ te drukken, om te beginnen met het instellen van de ‘Gradebook’.
Binnen de ‘Grades Setup Wizard’ zijn er 7 stappen die we kunnen instellen. Laten we de stappen doornemen:
Stap 1: Kies het Beoordelingssysteem
Er zijn drie beoordelingssystemen waar je uit kunt kiezen. Deze opties zijn hieronder uitgelegd:
- ‘Weighted’ (met weging)
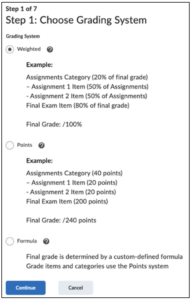 Dit beoordelingssysteem is handig als de cursus uit meerdere opdrachten bestaat, die samen uitkomen op een eindcijfer. Per deelopdracht kun je de weginginstellen.
Laten we een voorbeeld nemen waarbij een cursus bestaat uit meerdere opdrachten.
Schrijfopdracht 10%, Presentatie 20%, Tentamen 70%. Samen zijn ze 100%. - ‘Points’ (met punten)
Dit beoordelingssysteem volgt een soortgelijk indeling als het Weighted systeem, waarbij meerdere deelopdrachten uitkomen op een eindcijfer. Het verschil is dat er in plaats van percentages punten worden toegekend. - ‘Formula’ (met een formule)
Dit beoordelingssysteem maakt gebruik van een eigen berekening voor het eindcijfer, hierbij hoef je niet rekening te houden met de weging.
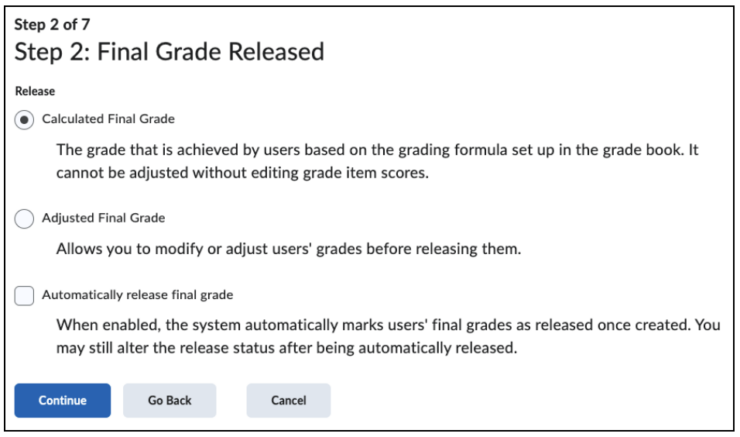
Stap 2: Eindcijfers
In deze stap staan instellingen over het eindcijfer.
Er zijn twee mogelijkheden voor het berekenen van het eindcijfer:
- De instelling staat standaard op ‘Calculated Final Grade’. Deze optie berekent het eindcijfer op basis van de gekozen instelling bij de vorige stap van het beoordelingssysteem.
- ‘Adjusted Final Grade’ zorgt ervoor dat je zelf aanpassingen kan maken aan de eindcijfers.
- Er is de mogelijkheid om de eindcijfers automatisch vrij te geven, dit is optioneel. Dit kun je aanzetten door het vakje ‘Automatically release final grade’ aan te vinken.
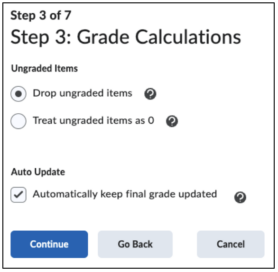
Stap 3: Cijfers Berekenen
In deze stap kun je kiezen wat je doet met ‘Ungraded Items’ (Niet beoordeelde cijfers). Hierbij heb je weer twee opties:
- ‘Drop ungraded items’, dit zorgt ervoor dat ‘Graded Items’ waarvoor geen cijfer voor is ingevoerd niet meetellen voor het eindcijfer. Dit is de standaardinstelling.
- ‘Treat ungraded items as 0′, dit zorgt ervoor dat Graded Items waarvoor geen cijfer voor is ingevoerd wel meetellen voor het eindcijfer als 0.
- Er is de mogelijkheid om ‘Auto Update’ in te schakelen. Dit zorgt ervoor dat eindcijfers automatisch worden aangepast als er wijzigingen worden aangebracht aan ‘Graded Items’ of berekeningen. Dit schakel je in door het vak aan te vinken. De instelling staat standaard aangevinkt.
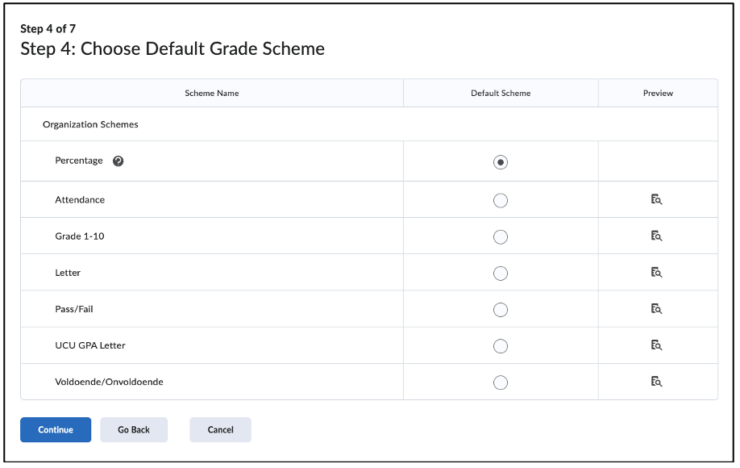
Stap 4: Kies Standaard Cijferschema
In deze stap kun je het ‘Default Grade Scheme’ (standaard cijferschema), voor de cursus kiezen. Dit is de vorm waarin de resultaten van de leerling worden gegeven. Je hebt hier keuzes uit verschillende opties: Percentage, Attendance, Grade 1-10, Letter, Pass/Fail en UCU GPA Letter.
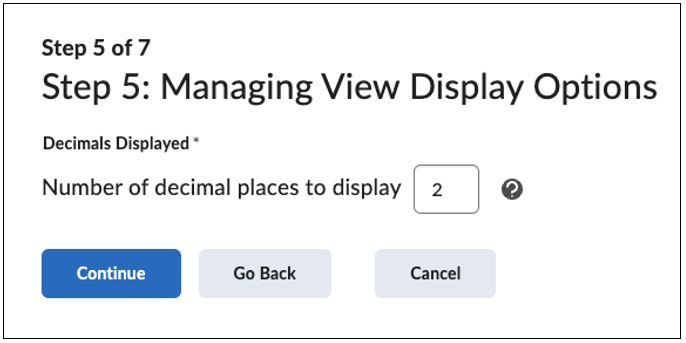
Stap 5: Weergaveopties Beheren
In deze stap kun je bepalen in hoeveel decimalen de cijfers zullen worden weergegeven. Dit is voor tijdens het invoeren van cijfers.
Stap 6: Weergaveopties voor Studenten
In deze stap kun je de weergaveopties voor studenten bepalen. Je kunt kiezen om details van de cijfers te laten zien. Hieronder staan de verschillende opties uitgelegd:
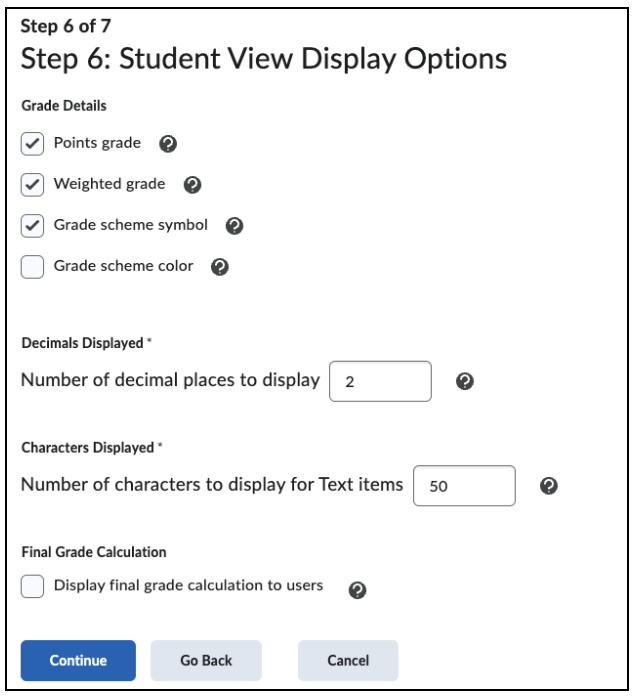
- ‘Points grade’: Dit laat de behaalde punten zien.
- ‘Weighted grade’: Dit laat de weging van het cijfer zien.
- ‘Grade scheme symbol’: Dit laat het cijferschema zien die je hebt gekozen in stap 4.
- ‘Grade scheme color’: Dit voegt kleur toe aan het cijfer.
- Bij ‘Decimals Displayed’ kun je het aantal decimalen van de cijfers bepalen die de studenten zullen zien.
- Bij ‘Characters Displayed’ kun je het aantal weergegeven karakters voor een tekst bepalen.
- Bij ‘Final Grade Calculation’ kun je bepalen of de studenten de berekening voor het eindcijfer kunnen zien. Door het vak aan te vinken zal de berekening zichtbaar worden.
Stap 7: Samenvatting van Cijferinstellingen 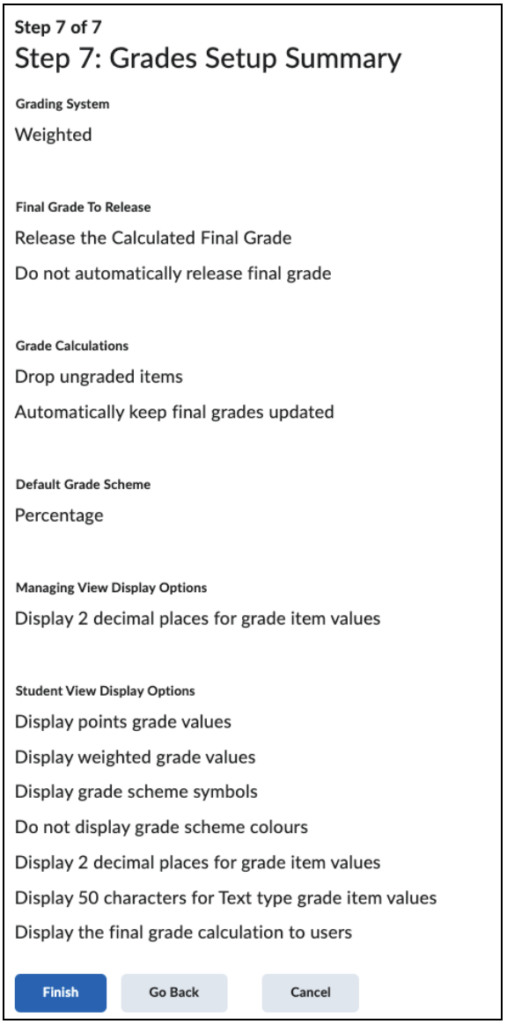
Dit is de laatste stap. Hier krijg je een overzicht van alle gekozen instellingen. Het is mogelijk om terug te gaan naar eerdere stappen door op ‘Go Back’ te klikken. De instellingen kan je later ook nog wijzigen onder ‘Settings’ bij de cijferpagina.


