
Manuals
Hoe kan je een cursus kopiëren in Brightspace?
In deze handleiding zal worden uitgelegd hoe je een course kan kopiëren. Hierbij zal naar de oude variant van de course, die gekopieerd wordt, worden gerefereerd als source course en naar de nieuwe course zal worden gerefereerd als target course. Bij het kopiëren van courses kan je zowel de structuur als de content (modules en documents) kopiëren. Een Course Copy kan ook worden uitgevoerd als je de content van een dummy cursus naar de officiële cursus wilt overzetten. Belangrijk is dat je in zowel de source course als de target course instructor bent. Deze handleiding bestaat uit de volgende secties:
- course template
- volledige course kopiëren
- alleen gedeeltes van de course kopiëren
- welke informatie wordt (niet) gekopieerd tijdens een course copy
- Gebruikers en gebruikersdata worden bijvoorbeeld nooit gekopieerd.
Course template
Als een course vanaf scratch samengesteld moet worden is het handig om een template te gebruiken dat je hierbij helpt. Vanuit de UU is er een template die helpt bij het vormen van de cursus en het aanbrengen van structuur. Het template bevat ook handige instructies.
Importeren van de Basic Course template
Open de target course en navigeer in de target course in de Toolbar naar ‘Course Management’ en dan naar ‘Course Admin’. Klik vervolgens op ‘Import/ Export/ Copy Components’.
Selecteer ‘Import components’ en klik op ‘Start’.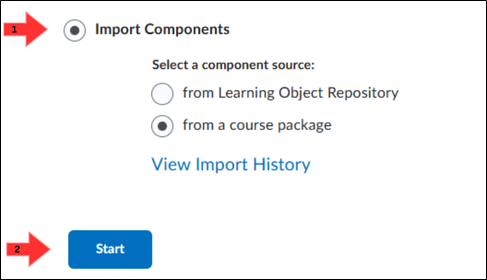
Klik vervolgens op ‘Upload’ en upload het template. Daarna klik op ‘Upload All Components’ als je de gehele basic course template wilt toevoegen. Mocht je eerst een selectie willen maken, bijvoorbeeld als je al weet dat je niet alle onderdelen van het template gaat gebruiken, klik dan op ‘Advanced options’. Het importeren kan een tijdje duren. Als het volledig geïmporteerd is, klik dan op ‘View content’ om de resultaten te bekijken. Verwijder en verplaats eventueel al bestaande content, zodat deze matchen met het basis template.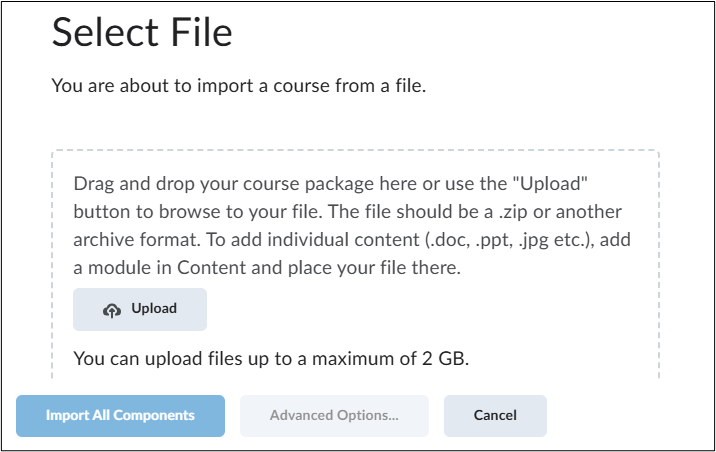
De volledige course kopiëren
Open de target course en navigeer in de target course in de Toolbar naar ‘Course Management’ en dan naar ‘Course Admin’. Klik vervolgens op ‘Import/ Export/ Copy Components’.
Vink vervolgens ‘Copy components from another Org Unit’ aan. Zorg ook dat ‘Include protected resources’ is aangevinkt.
Om de Source course te selecteren klik op ‘Search for offering’. Nadat je hierop hebt geklikt zal er een nieuwe pop-up window verschijnen.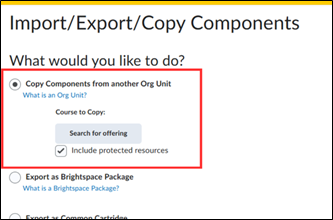
De pop-up window die tevoorschijn komt is weergegeven in onderstaande afbeelding. Zoek hier voor de source course bij naam of code. Selecteer deze en klik dan op ‘Add Selected’.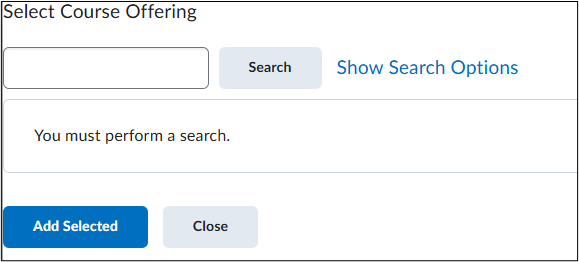
Klik vervolgens op ‘Copy all components’ onderaan de pagina om alle componenten van de source course te kopiëren naar de target course.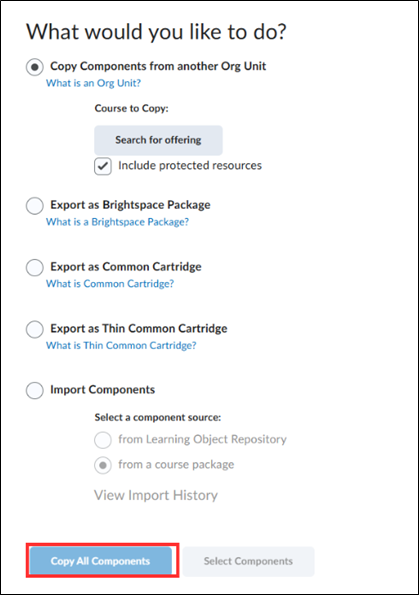
Wacht totdat Brightspace bevestigd dat het kopiëren van de course succesvol is. Dit kan even duren, afhankelijk van de grootte van de course.
Op deze manier heb je alle content, en bijna alle instellingen gekopieerd. Zie de sectie verderop in deze handleiding ‘Welke informatie wordt (niet) gekopieerd tijdens een course copy’, om te zien wat er precies wel en niet wordt gekopieerd.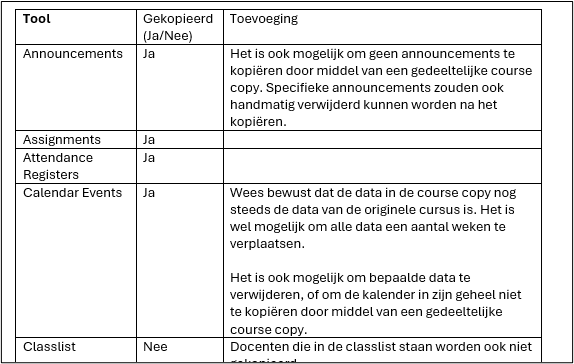
Klik op ‘Review and Manage Dates’ om alle restricties en data in één keer te kunnen controleren. door op ze te klikken.
Kijk ook onder ‘Course Tools’> ‘Assignments’ of alle gewenste assignments zijn gekopieerd. Ga ook naar ‘Grades’ en klik ‘Manage Grades’om te controleren of alle grade items goed gekopieerd zijn.
Alleen gedeeltes van de course kopiëren
Open de target course en navigeer in de target course in de Toolbar naar ‘Course Management’ en dan naar ‘Course Admin’. Klik vervolgens op ‘Import/ Export/ Copy Components’.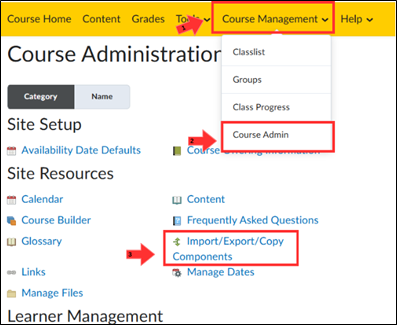
Vink vervolgens ‘Copy components from another Org Unit’ aan. Zorg ook dat ‘Include protected resources’ is aangevinkt.
Om de Source course te selecteren klik op ‘Search for offering’. Nadat je hierop hebt geklikt zal er een nieuwe pop-up window verschijnen.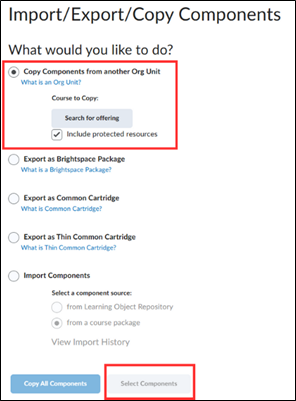
De pop-up window die tevoorschijn komt is weergegeven in onderstaande afbeelding. Zoek hier voor de source course bij naam of code. Selecteer deze en klik dan op ‘Add Selected’.
Klik vervolgens op ‘Select Components’ onderaan de pagina om componenten van de source course te kopiëren naar de target course.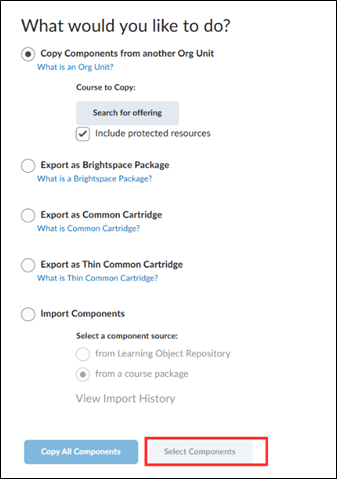
Klik nu op alle componenten die je wilt kopiëren. Je kan per component aangeven welke delen je wil kopiëren door te klikken op ‘Select individual items to copy’.
Let op de afbeelding hieronder is een voorbeeld, het daadwerkelijke scherm kan verschillen afhankelijk van de instellingen van de source course.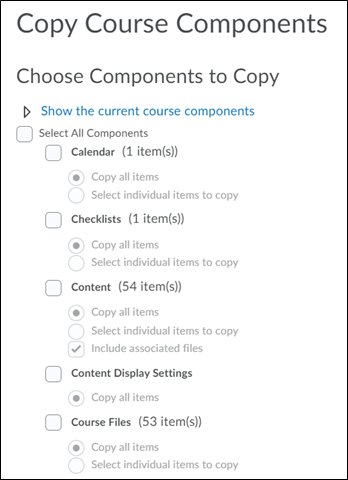
Door te klikken op het ‘+-icoon’kan je beter definiëren wat je wel en niet wil kopiëren. Dit klapt de modules uit en zo kan je ook specifieke sub-modules kiezen die je wilt kopiëren.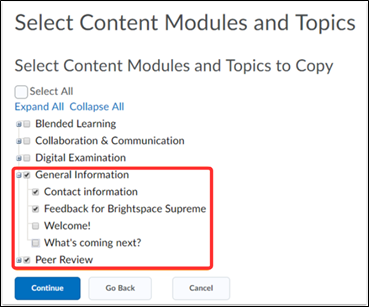
Klik vervolgens op ‘Continue’. Door te klikken op ‘Finish’ zullen de geselecteerde componenten gekopieerd worden van de source course naar de target course. Brightspace zal een conformatie geven van het voltooien van het kopiëren op een nieuwe pagina. Hier heb je de optie om een andere package te kopiëren, content te bekijken en review and manage dates van je target course.
Welke informatie wordt (niet) gekopieerd tijdens een Course Copy?
Bij het gebruiken van de Copy Course is het handig om te weten welke items wel en niet gekopieerd worden en welke handelingen gedaan moeten worden na een course copy.
Allereerst een belangrijke standaardregel: Data van en over specifieke studenten zal niet gekopieerd worden. Denk aan cijfers, ingeleverde opdrachten en discussion threads van studenten.
Verder zullen verschillende tools van Brightspace in onderstaande tabel één voor één worden afgegaan.
| Tool | Gekopieerd (Ja/Nee) | Toevoeging |
| Announcements | Ja | Het is ook mogelijk om geen announcements te kopiëren door middel van een gedeeltelijke course copy. Specifieke announcements zouden ook handmatig verwijderd kunnen worden na het kopiëren. |
| Assignments | Ja | – |
| Attendance Registers | Ja | – |
| Calendar Events | Ja | Wees bewust dat de data in de course copy nog steeds de data van de originele cursus is. Het is wel mogelijk om alle data een aantal weken te verplaatsen.
Het is ook mogelijk om bepaalde data te verwijderen, of om de kalender in zijn geheel niet te kopiëren door middel van een gedeeltelijke course copy. |
| Classlist | Nee | Docenten die in de classlist staan worden ook niet gekopieerd |
| Content | Ja | Pas op met externe functionaliteiten, er is een risico dat deze na een course copy niet meer goed werken. |
| Content Status Hidden/ Visible | Ja | Je kunt ervoor kiezen om extra items op Hidden te zetten voordat studenten toegang krijgen tot de cursus |
| Course Files | Ja | – |
| Discussions | Ja | Let op: alleen de structuur (de discussion fora en topics) worden gekopieërd. Berichten van studenten en/ of docenten worden niet gekopieërd. |
| External Learning Tool Links | Ja | – |
| Gradebook | Ja | Let op: Cijfers worden niet gekopieërd, alleen de grade items, structuur en associated activities (bijvoorbeeld een koppeling met een assignment) |
| Groups | Ja | Let op: Group enrollments worden niet gekopieerd. Alleen de structuur van de groepen, de gekoppelde release conditions/ assignments en discussions. |
| Release conditions | 99% | Release conditions die gebaseerd zijn op section inschrijvingen worden niet gekopieërd. Deze conditions moeten opnieuw ingesteld worden voor iedere cursus. |
| Rubrics | Ja | – |
| Quizzes | Ja | Zowel de quizzes als de question libraries. |
| Sections | Nee | Dit betekent ook dat de release conditions gebaseerd op section inschrijvingen niet gekopieërd worden. |
| FeedbackFruits modules | Ja | – |