
How to organize a course for the next academic year?
This manual will explain how to copy a course. The old, to be copied course, will be referred to as the Source course. The new course will be referred to as as the target course. When copying a course, you can copy both the structure and the content (Modules and documents). It’s important that you are an instructor in both the target and the source course! This manual consist of the following sections:
- Course template
- Copying the whole course
- Copying components of the course
- Which information is (not) copied during a course copy
- For example, users and user data will never be copied.
Course template
When a course is assembled from scratch, it could be useful to use a template which guides you during this process. The UU has a template that helps assembling the course and adding structure to the course.
Import Basic template
Open the target course in Brightspace and navigate within the target course Toolbar to ‘Course Management’ and then to ‘Course Admin’. Then click on ‘Import/ Export/ Copy Components’.
Select ‘Import Components’ and click on ‘Start’.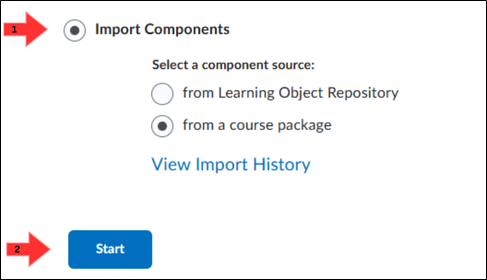
Then click on ‘Upload’ and upload the template. Then click on ‘Upload All Components’ if you want to add the whole basic template. If you only want to upload a selection of the basic template, for example when you already know that you are not going to use all the components, then click on ‘Advanced Options’. Importing the template could take a while. When the template is imported click on ‘View Content’ to see the results. Remove and transfer existing contents to the right folders in the template.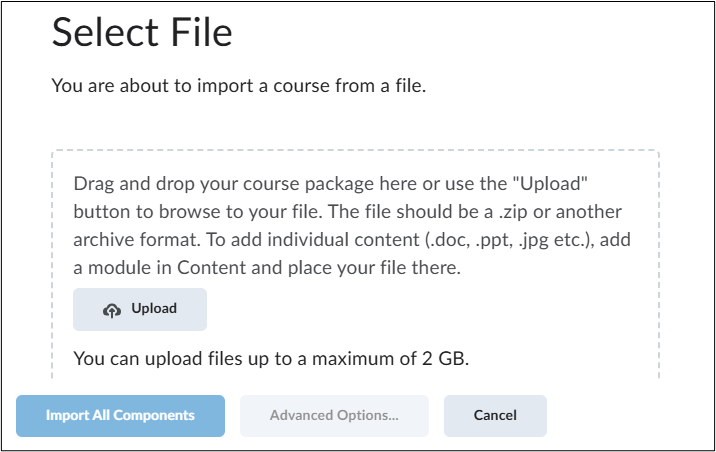
Copying the whole course
Open the target course in Brightspace and navigate within the target course Toolbar to ‘Course Management’ and then to ‘Course Admin’. Then click on ‘Import/ Export/ Copy Components’.
Make sure that ‘Copy Components from another Org Unit’ is checked as well as ‘Include protected resources’.
To select the source course click on ‘Search for offering’. After clicking, a new pop-up window will show.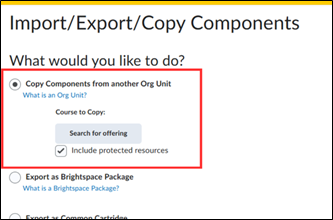
The new pop-up window is shown in the picture below. Search here for the source course by name or code. Select the course and then click on ‘Add Selected’.
Then click on ‘Copy All Components’ at the bottom of the page to copy all components of the source course to the target course.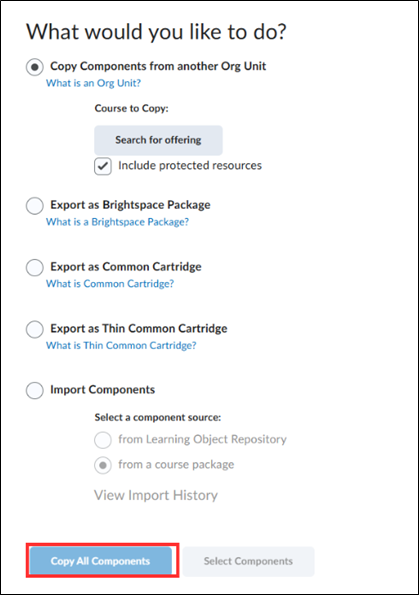
Wait until Brightspace confirms that the course is copied successfully. This could take a while, depending of the size of the course.
This way, all content of the course and almost all settings are copied. In the section which information is (not) copied during a course copy, the last chapter of this manual, you can view what gets copied, and what not.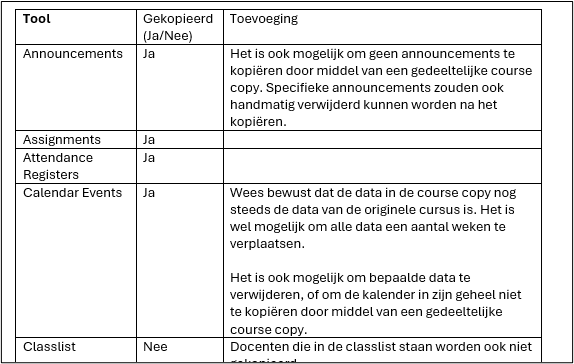
Click on ‘Review and Manage Dates’ to check all restrictions and dates at once. You can change due dates, availability dates and other types of dates here by clicking on them.
Furthermore, look under ‘Course Tools’> ‘Assignments’ if all necessary assignments are copied. Also go to ‘Grades’ and click on ‘Manage Grades’ to check if all grade items are copied correctly.
Copying components of the course
Open the target course in Brightspace and navigate within the target course Toolbar to ‘Course Management’ and then to ‘Course Admin’. Then click on ‘Import/ Export/ Copy Components’.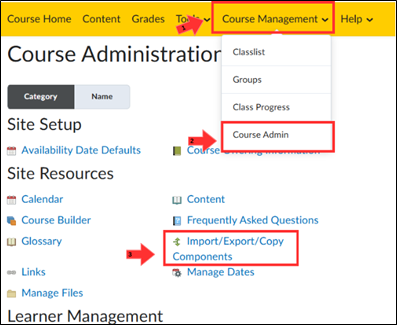
Make sure that ‘Copy Components from another Org Unit’ is checked as well as ‘Include protected resources’.
To select the source course click on ‘Search for offering’. After clicking, a new pop-up window will show.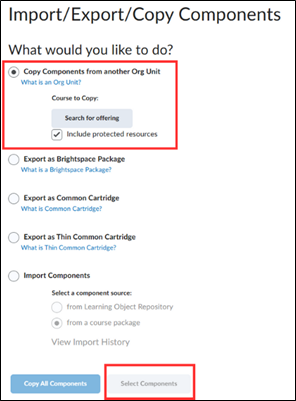
The pop up window that will show, is displayed in the picture below. You can search for the source course by name of code. Select the course and then click on ‘Add Selected’.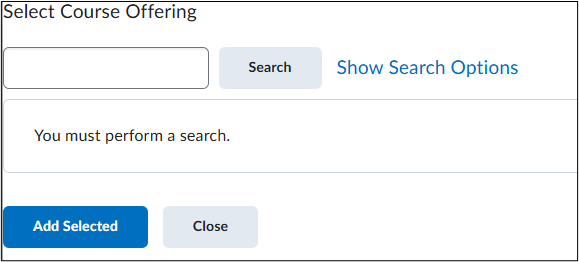
Then click on ‘Select Components’ at the bottom of the page to copy specific components of the source course to the target course.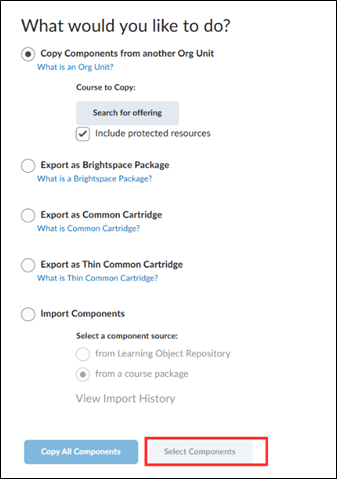
Check all the components you want to copy. You can choose per components which parts of the component you want to copy by clicking on ‘Select Individual Items To Copy’.
The image below is an example, your screen could be different depending on the setting of the source course.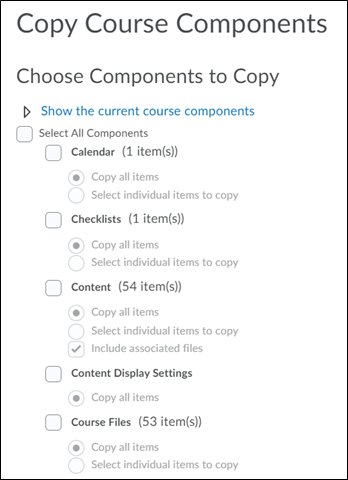
By clicking on the ‘+-icon’ you can define in more detail what you do and do not want to copy. This will fold out the modules, which allows you to choose specific sub-modules to copy.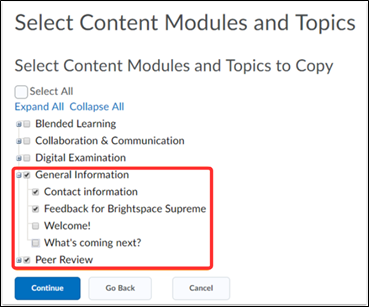
Then click on ‘Continue’. By clicking on ‘Finish’ the selected components will be copied from the source course to the target course. Brightspace will confirm if the copy is completed successfully on a new page. Here you can choose to copy another package, view content or review and manage dates from the target course.
Which information is (not) copied during a course copy
When using the Course Copy function, it is useful to know which items are included and which are not, and which actions need to be taken after a course copy. This manual will provide an explanation.
An important standard rule: data from and about specific students will not be replaced, such as grades, submitted assignments and discussion threads of students. Other tools will be explained one by one in the table below.
| Tool | Will be copied
(Yes /No) |
Additional explanation |
| Announcements | Yes | It is also possible to copy no announcements with a partial course copy or specific announcements can be removed manually after copying. |
| Assignments | Yes | – |
| Attendance Registers | Yes | – |
| Calendar Events | Yes | Please note that the dates are still on the dates of the original course. It is possible to move all dates by a certain number of weeks.
It is also possible to delete specific dates or not copy the calendar at all with a partial course copy. |
| Classlist | No | Instructors on the classlist will also not be copied. |
| Content | Yes | Be aware of external tools, these could be copied incorrectly |
| Content Status Hidden/ Visible | Yes | You may want to set some things to Hidden before students access the course. |
| Course Files | Yes | – |
| Discussions | Yes | Note: Only the structure (the discussion forums and topics) is copied. Messages from students or teachers are not included. |
| External Learning Tool Links | Yes | – |
| Gradebook | Yes | Note: student grades are not copied, only the grade items, structure, and associated activities (e.g. link with an assignment). |
| Groups | Yes | Note: Group enrollments are not copied, only the structure, the associated release conditions / assignments and/or discussions. |
| Release conditions | 99% | Release conditions based on Section Enrollments are not copied. You always have to set them for every course. |
| Rubrics | Yes | – |
| Quizzes | Yes | Both quizzes and question libraries |
| Sections | No | This also means that release conditions based on section enrollments are not included. |
| FeedbackFruits modules | Yes | – |