Manuals
How do I use Assignments for Groups?
This guide is intended for teachers and explains how to create Assignments for groups.
If students need to work together on an assignment, it is possible to set up a joint submission point through a group assignment. If you haven’t created groups yet, read the guide How do I set up Groups (in bulk)? before continuing.
There are two ways to create a group assignment:
- Via Assignments: if the group(s) have already been created and/or there is already a group assignment.
- Via Groups: if there are new groups that need access to assignments. If an assignment is already linked to a group category, this option is not available.
Note: If there are many different groups in a course and each group must be linked to a different assignment, the groups must be added to separate Group Categories. This is because assignments can only be linked to Group Categories, not to individual groups within a category. If no groups exist in the course and/or a new Group Category needs to be created, follow the guide How do I set up Groups (in bulk)? (and check the box Set up Assignments under Additional Options). Once this is done, the steps below can be followed.
Create Group Assignments via Assignments
Navigate to ‘Tools’ in the course navigation bar and click on ‘Assignments’.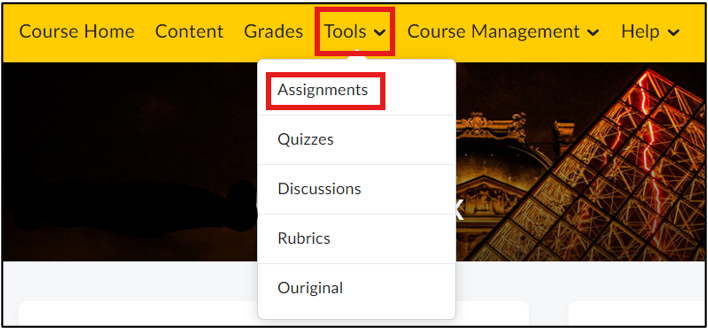 Click on ‘New Assignment’.
 Give the assignment a name: This is the name that will be displayed on the ‘Assignments’ homepage. Choose a name that clearly indicates that it is a group assignment. More information about the assignment and/or a brief instruction can be entered in the HTML editor.
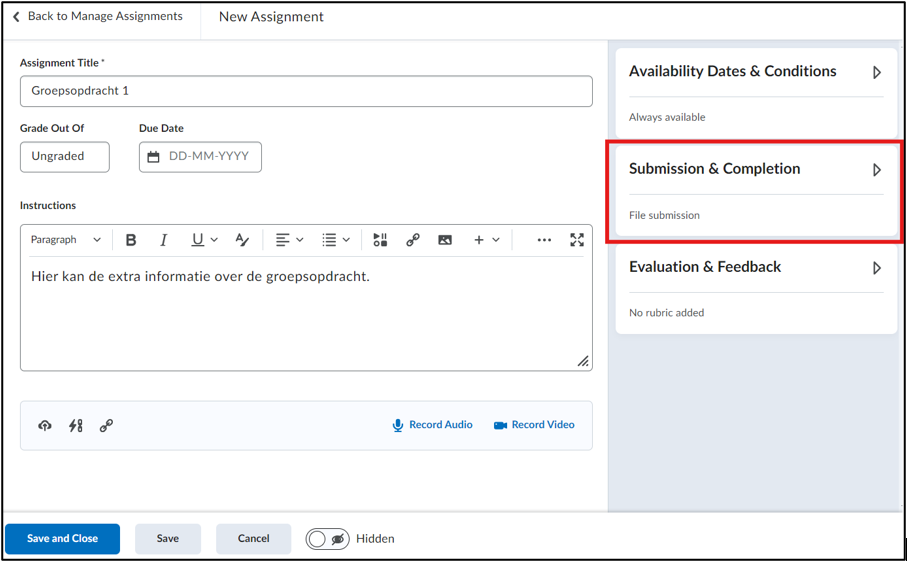
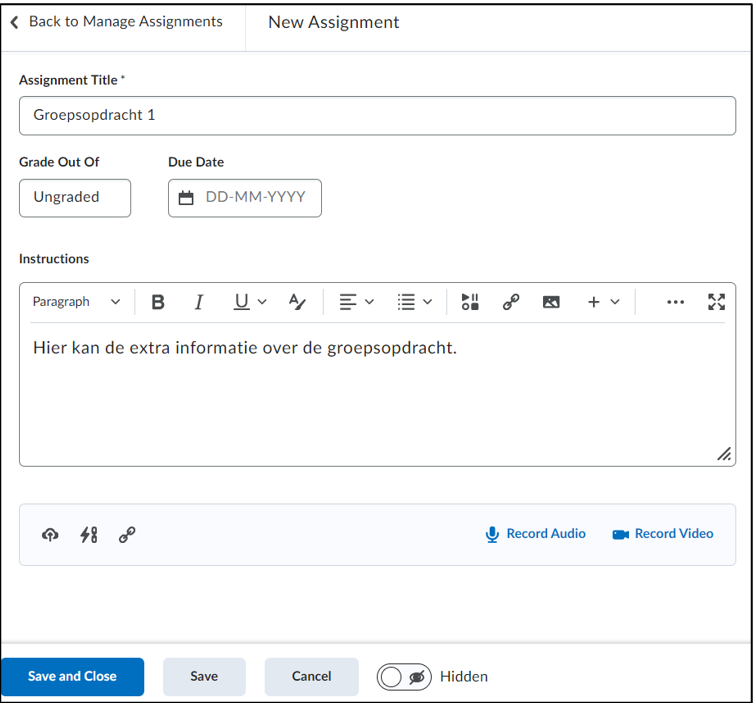 Then go to ‘Submission & Completion’.
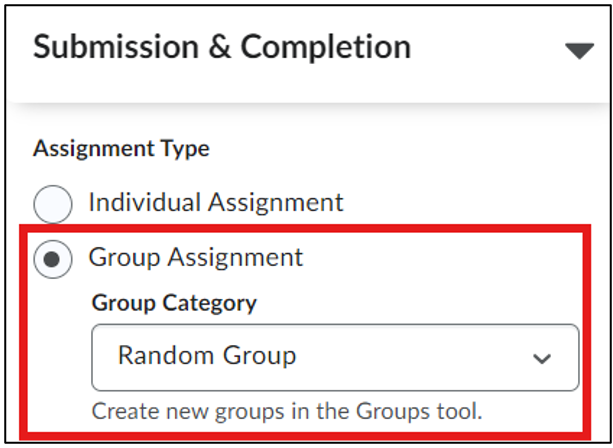
 Indicate under Assignment Type that it is a group assignment (Group Assignment). Select the ‘Group Category’ – the collection of groups for whom the assignment is intended.
 Fill in the remaining details with the information required for the assignment and then click ‘Save and Close’.
Note: Don’t forget to publish the assignment. This can be done by making the assignment visible on the Edit Assignment page (see the image below). The assignment can also be published by clicking on ‘Course Tools’ –> ‘Assignments’ (select the assignment to be published), then clicking on ‘More Actions’ and selecting ‘Make visible to users’.
Create Group Assignments via Groups
Note: This is only possible if no assignment has been linked to the group yet.
Navigate to ‘Course Management’ in the course navigation bar and click on ‘Groups’.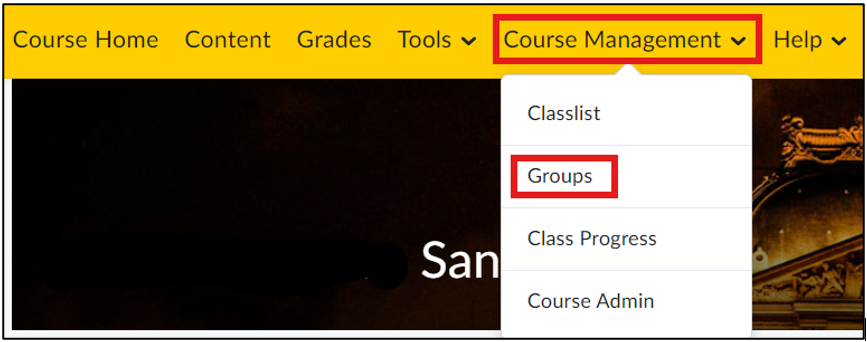 In this example, an assignment is created for an existing group. If no groups have been created yet and/or there is a new group that needs to be linked to an assignment, follow the guide How do I set up Groups (in bulk)? before proceeding with the steps below.
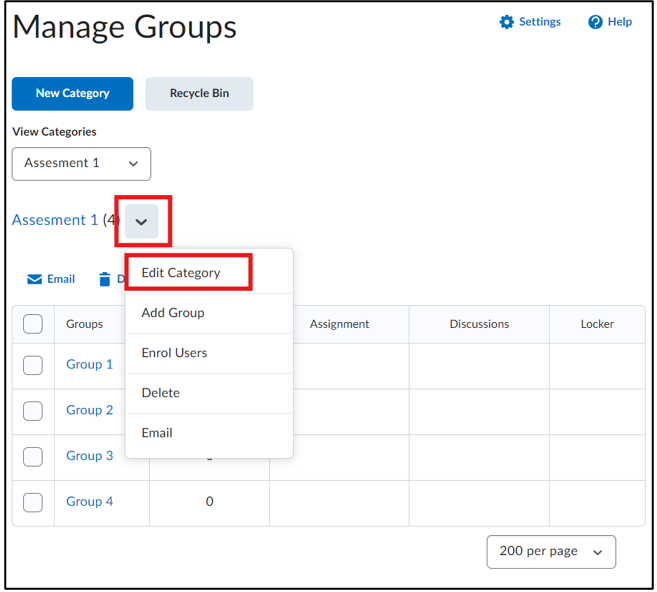
Use the drop-down menu under ‘View Categories’ to select the group category to which the assignments should be added (in the image below, it can be seen that the Group Category “Assessment 1” is selected and that this category consists of 4 groups).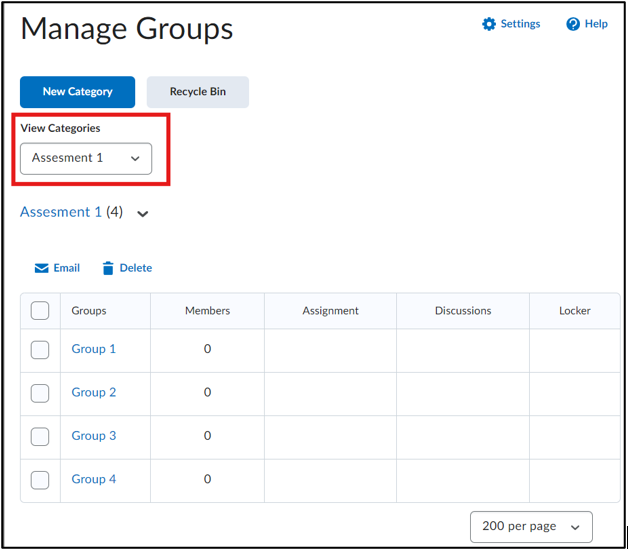 Click on the drop down menu next to the name of the group and click on ‘Edit Category’.
 Scroll down and check the box for ‘Set up assignment’ (under Additional Options). Then, choose the type of submission from the drop-down menu: File submission (document submission, such as a Word document or PDF), Text submission (text submission in the HTML editor), On paper submission (paper submission that is not submitted online), or Observed in person (observed in person, such as a presentation).
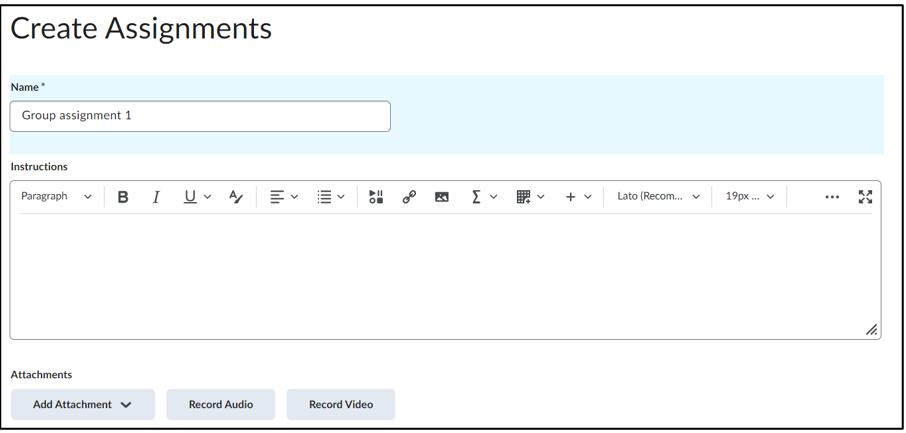
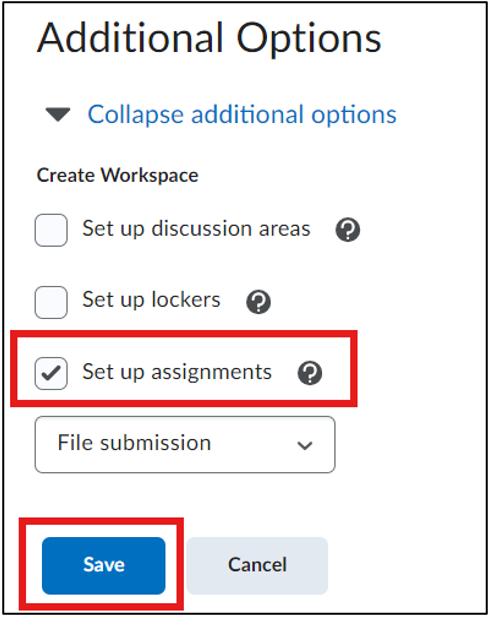 Click ‘Save’. The Create Assignments page will now open. Give the assignment a name (one that clearly indicates it is a group assignment), and additional instructions can be provided in the text box or via an attachment using the ‘Add Attachment’ button.
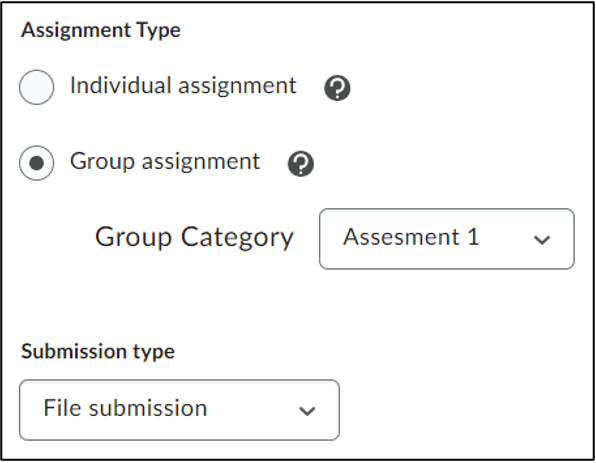
 Under ‘Assignment Type’, it is shown that this is a ‘Group Assignment’ for a specific group, and under ‘Submission type’, it is indicated that this is an assignment for which the groups must submit a document in Brightspace. The settings you filled in during the previous steps will automatically remain the same in this step. Fill in the other settings in the same way as you would for any other assignment.
 Click ‘Create’ when the assignment is ready. Or click ‘Add Another’ if another assignment needs to be added (for example, if each group has to submit a small assignment every week, a separate assignment needs to be created for each week). You will now see a summary of the choices made. Click ‘Done’.
The Groups page will now reappear. To set up discussion areas or lockers, follow these steps. First click on the arrow next to the group name and click ‘Edit Category’.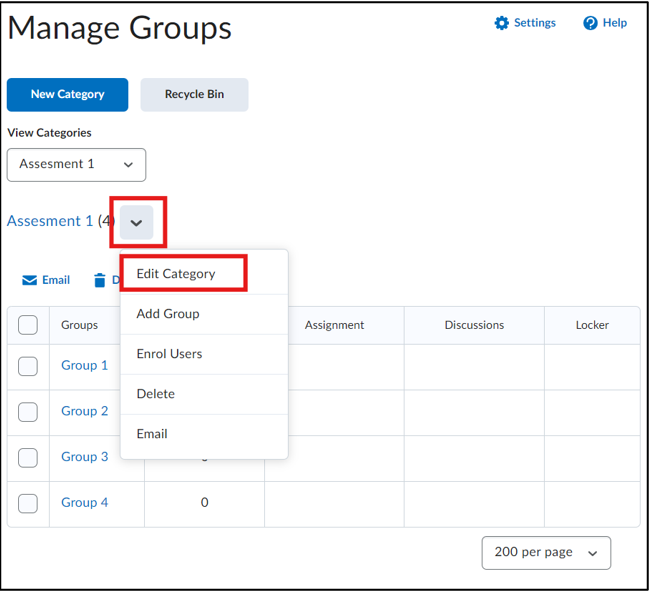 At the bottom of the page, a new heading now appears: Existing Workspace, with the assignments that were just created listed underneath. In the example below, only one assignment has been added: Group Assignment 1.
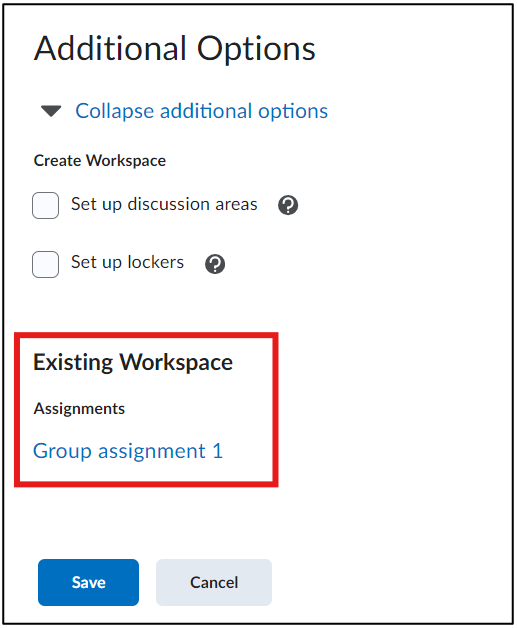 Above the Existing Workspace, you can check two options under Additional Options:
- Set up discussion areas to create a group discussion topic. Note: each group will then have access to their own discussion topic to collaborate.
- Set up lockers to give groups access to their own locker: a shared digital space where they can store documents.
Click on the name of the assignment to navigate to the group assignment.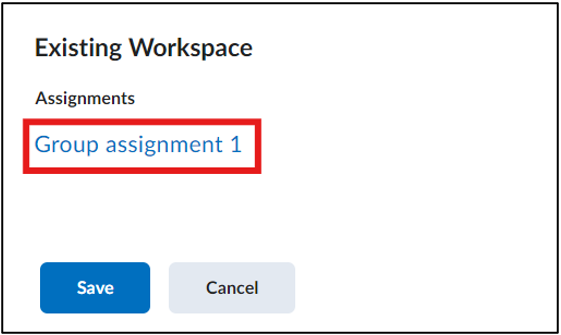 Click ‘Save’ to return to the main page of the group category under Manage Groups.
Example
In the middle column (Assignment), it is now shown that an assignment has been assigned to the group(s). Click the link to view the submitted assignments. If a question mark appears next to the assignment instead of a link, it means the group has not submitted anything yet.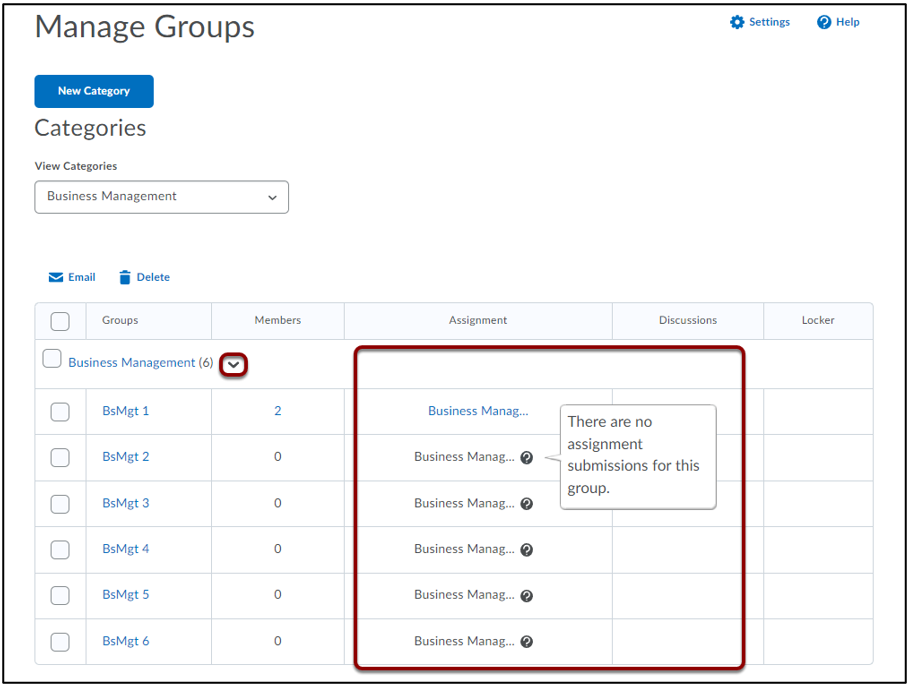 Don’t forget to:
- Add students to the groups (if you have chosen to do so manually). Click on the name of the group and then click ‘Enrol Users’, OR click the arrow next to the group category name and then click ‘Enrol Users’.
- Publish the assignment so that it is visible to students, allowing them to submit their assignments.

