How do I use Rubrics?
Rubrics are assessment tools used to evaluate student performance based on predefined criteria. They typically consist of rows and columns, where rows represent assessment criteria and columns define performance levels. Rubrics help ensure consistent and transparent grading and can provide students with clarity. Students will know what is expected of them and on what criteria they will be evaluated.
Table of Contents
- Creating Rubrics in Brightspace
- Navigate to Rubrics
- Create a New Rubric
- Set Up Rubric Structure
- Add Criteria Points and Levels
- Overall Score
- Extra Options
- Publish the Rubric
- Linking Rubrics to Assignments
- Using Rubrics for Grading
- Editing or Deleting Rubrics
1. Creating Rubrics in Brightspace
Navigate to Rubrics
Log in to Brightspace. Open the course where you want to create a rubric, then go to ‘Tools’ -> ‘Rubrics’.

Create a New Rubric
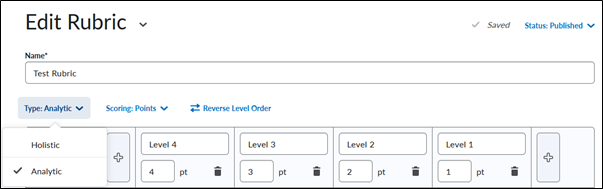
In the Rubrics screen, click the ‘New Rubric’. Enter a name for your rubric in the ‘Name’. Choose whether the rubric should be ‘Analytical’ or ‘Holistic’:
- ‘Analytical’: Includes multiple criteria with different performance levels for each.
- ‘Holistic’: Features one set of performance levels to assess overall performance.
Set Up Rubric Structure
For this manual, we will be using examples based on an Analytical rubric. Define the performance levels and criteria structure:
Add columns for performance levels by clicking on the + in the top left or top right (e.g., Excellent, Good, Sufficient). These can be deleted by clicking on the Bin Icon in the top row.
Add rows for each criterion to be assessed by clicking on ‘+ Add Criterion’ in the bottom row (e.g., Content, Analysis, Presentation). These can be deleted by clicking the three dots in the left most column and clicking ‘Delete Row’.
- ‘Criteria Groups’: It is also possible to add multiple Criteria Groups by clicking on ‘Add Criteria Group’. This adds a new criteria table, like the one on the image. This makes it possible to assess different parts of an assignment separately.

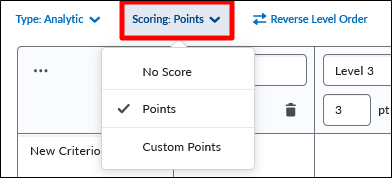
- ‘Scores’: Add, if desired, scores to performance levels. By connecting points to performance levels, assessment can be made easier and fairer. For example, a student gets 10/10 points if they reach the highest performance level, or a 1/10 if they reach the lowest. If points are used, you can also make use of automatic grading. It is not possible to use a point range because then the automatic grading will not work.
-
- ‘No Score’: there will be no scores added to the rubric. With this choice, the automatic grading cannot be used.
- ‘Points’: Points will be added per performance level, these are the same for every criterion. They can be changed by clicking in the points box.
- ‘Custom Points’: Points can be allocated for each criterion per performance level.
Add Criteria Points and Performance Levels
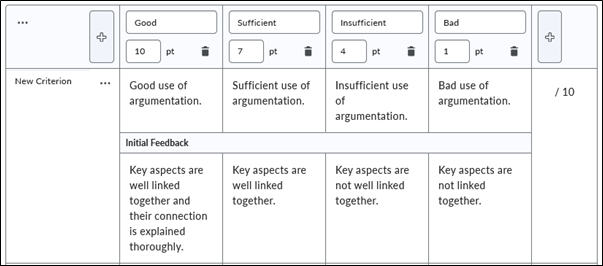
Click a cell in the rubric to input descriptions and points for each performance level. Provide clear descriptions for what is expected at each performance level. Repeat this process for all criteria. Under ‘Initial Feedback’ you can add criteria-specific feedback.
Note that this feedback will not be displayed with the general feedback. This feedback can be used by students while making the assignment. Performance levels can be deleted by clicking on the bin icon in the top row.
Overall Score
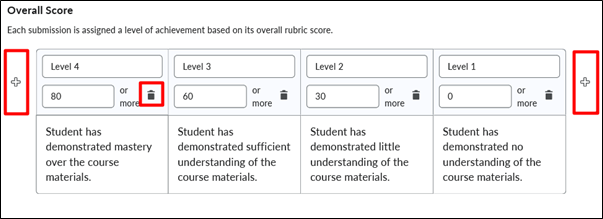
Note! The Overall Score only provides students with guidance on how to improve. The Total Score is the score that is transferred to Grades after the assignment.
The Overall Score is a separate feature within the Rubrics tool. Here, you can highlight performance levels based on the total scores that students can achieve. For each level, specify how many points students need to earn to reach that level. Use the + symbol to add more levels and the trash can icon to remove them.
Note that the points for the Overall Score match the obtainable points from the rubric, not an obtainable grade. If there are 100 points available for the assignment, then set the points for the highest level of the Overall Score to 80 for example. You can add feedback for each level.
 Extra Options
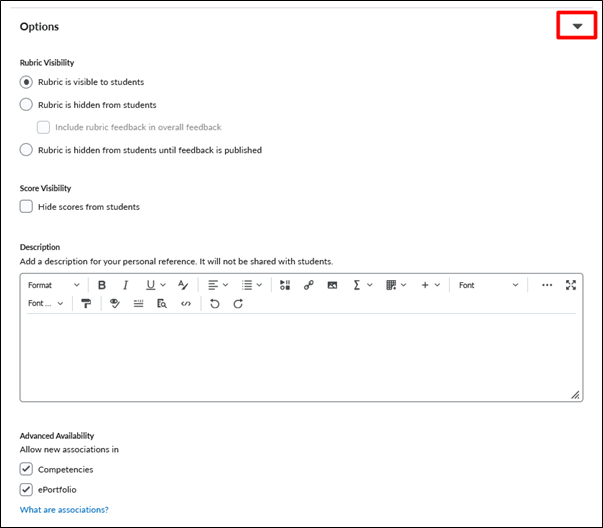
Click the arrow next to ‘Options’ for additional settings. Decide whether students can view the rubric.
- ‘Rubric is visible to students’: Students can view the rubric as soon as they see the linked assignment.
- ‘Rubric is hidden from students’: Students cannot view the rubric.
- ‘Rubric is hidden from students until feedback is published’: Students can view the rubric only after feedback for the activity is published.
Click ‘Hide scores from students’ if you do not want students to see the scores. You can add a brief description to the rubric; this description will not be visible to students. Ensure that the ‘Competencies’ box is checked, or the rubric cannot be linked to ‘Assignments/Discussions’.
Saving and Publishing the Rubric
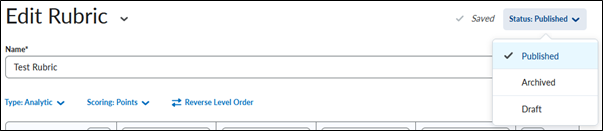
The Rubrics tool automatically saves your progress; you can check that it is saved in the top-right. Ensure the rubric is published to make it available for use in assignments.
To publish the rubric, go to the ‘Status’ menu in the top-right corner.
2. Linking Rubrics to Assignments
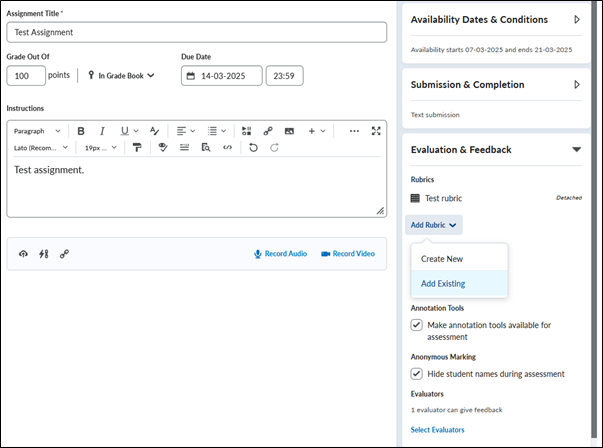
Navigate via ‘Content’ or ‘Tools’ to the assignment you want to link with a rubric. Click ‘Edit Assignment’ or create a new assignment. Scroll down to the ‘Evaluation & Feedback’ section on the right side. Click ‘Add Rubric’ -> ‘Add Existing’, and select the rubric you want to use. Or make a new rubric.
If you create a rubric this way, you will go to a screen where you can set up a new rubric the same way as when you make a rubric via the rubrics page, the rubric can afterwards also be found on that page.
Click on ‘Save and Close’.
3. Using Rubrics for Grading
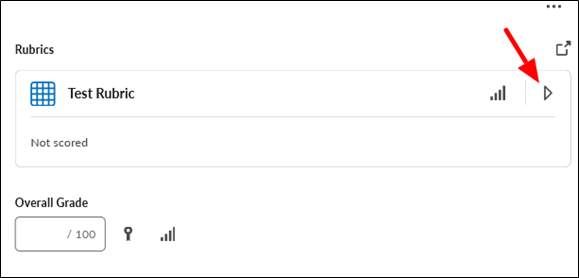
Open the assignment you wish to grade. Click on the right on the ‘Rubric’ to use it during the grading process.
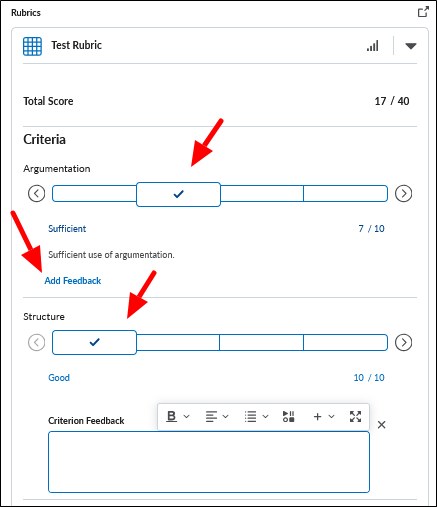
Select the performance level for each criterion. Brightspace will automatically calculate the total score based on the selected levels. Based on the total amount of points (given in the rubric, not the eventual grade for the assignment), the ‘Overall Score’ will also be automatically selected. Optionally, add feedback.
This can be done per criteria by clicking ‘Add Feedback’, a text box will appear.
For the complete assignment, feedback can be given at the bottom.
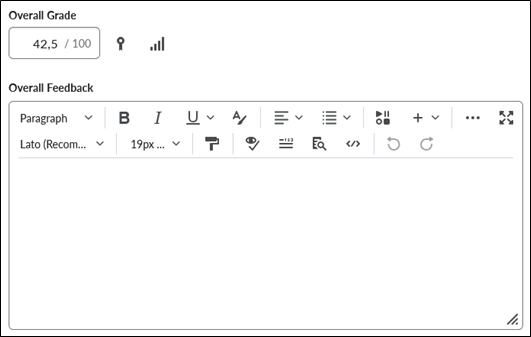
Click ‘Publish’ or ‘Save Draft’ to finalize the grading.
When the rubric has been used to evaluate student work, it becomes impossible to edit the structure. Performance levels and point totals are then locked. If necessary, the text can be edited. To do so, click on ‘Edit Text’ in the pop-up that appears when you go to the rubric editor.

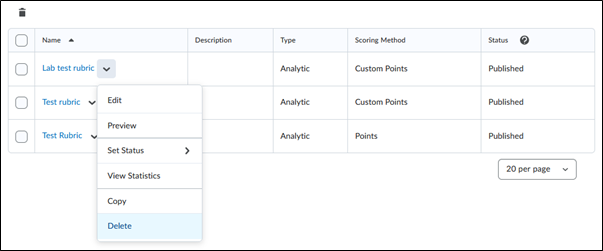
4. Editing or Deleting Rubrics
Go to the ‘Rubrics’ menu in your course. Click on the rubric you wish to edit. Modify the rubric by editing criteria or performance levels as needed. To delete a rubric, go to the ‘Rubrics’ menu, click on the arrow next to the rubric and click ‘Delete’.