
Attendance
Taking attendance in Brightspace is easy, use the attendance tool! Taking attendance in Brightspace provides insight in the attendance percentage and you can see which students are missing too many classes.
Before starting, make sure you’ve selected the correct course. From the homepage, navigate to ‘activities’ in the yellow toolbar. From the dropdown menu, select ‘attendance.’
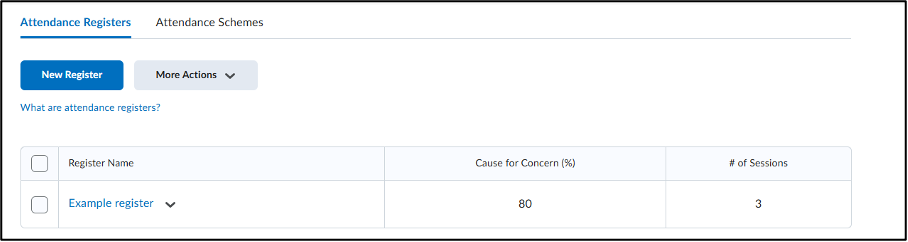
Now you’re on the attendance page. It consists of 2 tabs: attendance registers and attendance schemes.
Creating an attendance scheme
An attendance scheme allows you to set up the way you take attendance. If you don’t set up an attendance scheme, you’ll use the default scheme. On the Attendance Scheme page, you’ll see 2 schemes under Organisation Schemes. System Scheme (Organisation Default) includes 2 attendance statuses: P (for present), which assigns 100%, and A (for absent) which assigns 0%. Attendance extended (PALE) is not the default, and includes 4 attendance statuses: P (for present) and L (for late), which both assign 100%, and A (for absent) and E (for excuses), which both assign 0%. If these don’t align with your course, you can also make one yourself.
To make an attendance scheme:
- Click ‘attendance schemes’ and then click ‘new scheme’
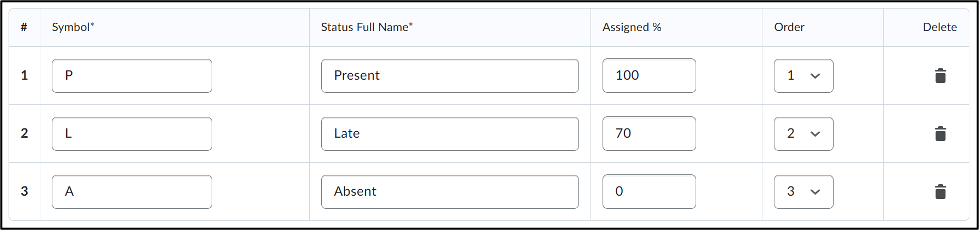
- Give your attendance scheme a name and assign attendance statuses. You can add several attendance statuses, like in the example below. To add more statuses, type the amount of statuses you want to add and click ‘Add Statuses’. When you’re done setting up your scheme, click ‘save’.
Creating an attendance register
After you’ve made an attendance scheme, you can start creating registers, in which you actually take attendance. After saving your attendance scheme, you’ll be brought back to the attendance scheme page. From here:
- Click ‘attendance registers’ in the top left corner, under the yellow toolbar.
- Click ‘new register’
- Now, you can give your attendance register a name. You can create one register for the whole course, but you can also create a register per seminar group, or any other groups you have made for the course, so make sure you give your attendance register a clear name. You can also add a description.
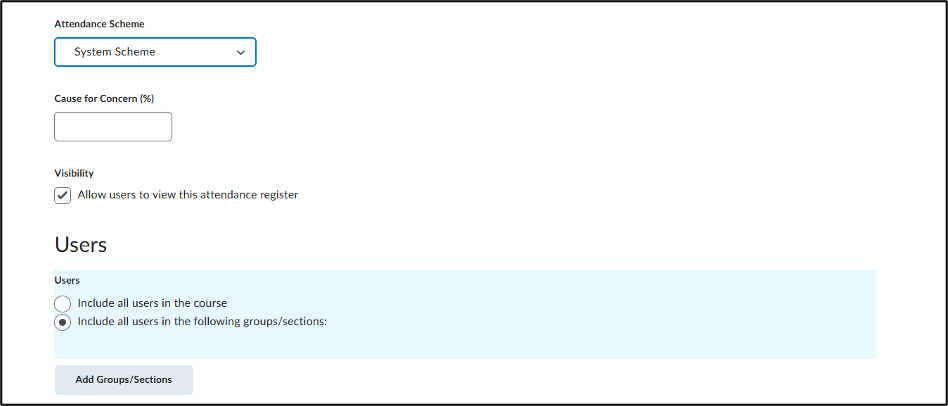
Next, you can choose what attendance scheme this register will use. New registers will automatically be assigned the default system scheme, but you can choose others from the drop-down menu.
In the next setting, you can add a cause for concern percentage. If we look at the example attendance scheme above, you’ll see that all the statuses have a different percentage. Let’s say, the course has 10 seminars, and the students can miss 2 whole classes to still finish the course. They would need 80% attendance to finish the course, so here you fill in what percentage students generally need to be present, to still finish the course. It is up to you whether this percentage immediately means they fail the course or is cause for a serious talk, but you can elaborate on that in the description above.
If you want your students to be able to see their attendance percentage, make sure the box under ‘visibility’ is checked. It will allow students to view the attendance register.
Under ‘users’ you can choose whether the register includes all students in the course or only from certain groups or sections. This is only helpful if you need to keep these groups separate, because you can filter based on groups in the attendance register that includes all users as well. More on this under the Taking Attendance tab. Important: if it is necessary to create a separate attendance register for a group, you must first create the groups under the ‘groups’ tab in the yellow toolbar before you create the attendance register. You can also use the OSIRIS seminar groups, by turning on the OSIRIS to Brightspace-seminar groups in OSIRIS. You cannot create new group categories or groups from the attendance page.
To add an existing group:
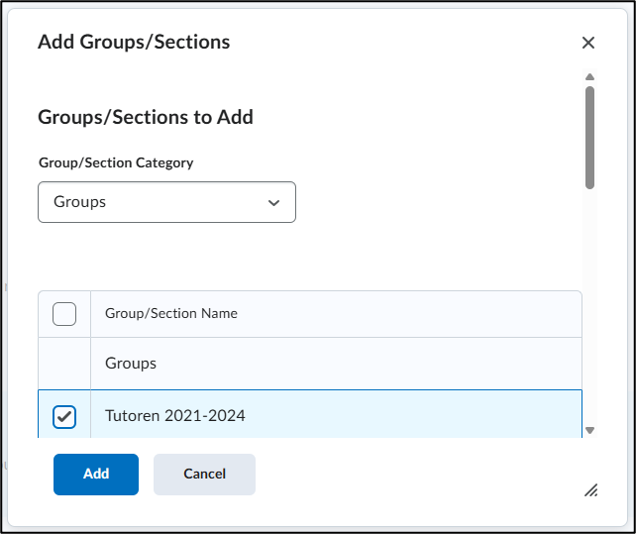
- Select ‘include all users in the following groups/sections:’ after which the ‘add groups/sections’ button will become available. Click that and you’ll get a pop up window in which you can select the group/section category and consequently, the group/section(s).
- When you’ve selected the correct category and group/section(s), click ‘add’
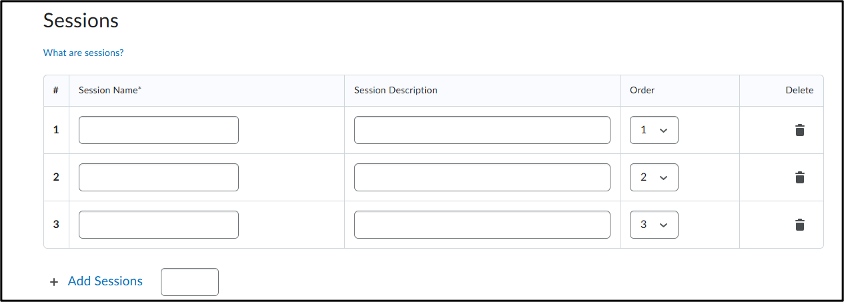
Next, you can add sessions. Sessions are the components of an attendance register that define the events that the register tracks. Let’s say, your course still has 10 seminars and 10 lectures. If your course is very big, you may not want to take attendance for the lectures, so you need 10 sessions for your attendance register. Now there are only 3 sessions, so:
- Fill in ‘7’ in the text box next to ‘add sessions’ and click ‘add sessions´. Give all of your sessions a name, e.g. ‘seminar 1’. You can also add a short description, like what topics the class covers, but this is not necessary. If you have a smaller course and wish to take attendance for lectures too, you can add more sessions for your lectures in this same attendance register, if this register includes all the students in your course, or you can create another register for lectures, and track attendance for lectures and seminars separately. You can also edit the order of the sessions or delete sessions.
- After you’ve finished setting up your attendance register, click ‘save’ in the bottom left corner.
Taking attendance
To use your register:
- Click the register name in the Attendance Registers tab.
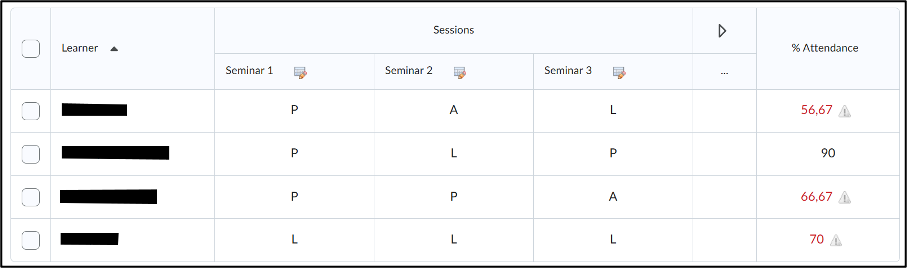
Now you’re in your attendance register.
To take attendance:
- Click on the icon next to the session name. This will take you to the session page, where you can edit each student’s status.
Each student has a dropdown menu under ‘attendance status’. The options in this dropdown menu, will correspond with the symbols you’ve assigned to the attendance statuses you’ve made in the attendance scheme that you chose for this register.
- Click the correct symbol to assign a status to the student.
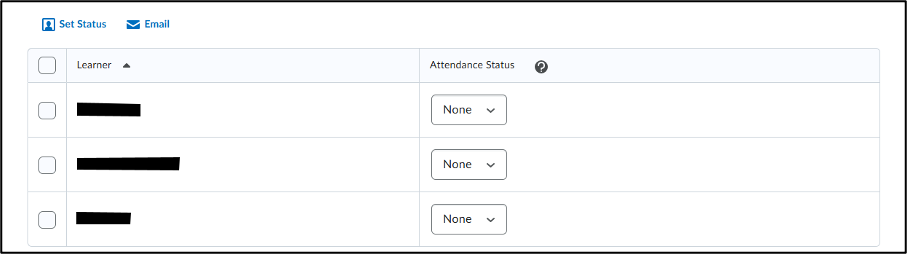
This fantasy course we’re using as an example only has a few students, but your course likely has a lot more, most of whom will (hopefully) be present. So, rather than manually assigning a status to a lot of students, you can also:
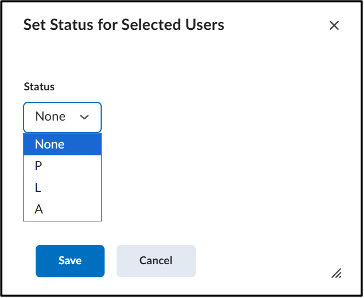
- Select students by checking the box to the left of the students name, and click ‘set status’
- This will open a popup window with a dropdown menu, in which you can select the correct status. Then, click ‘save’.
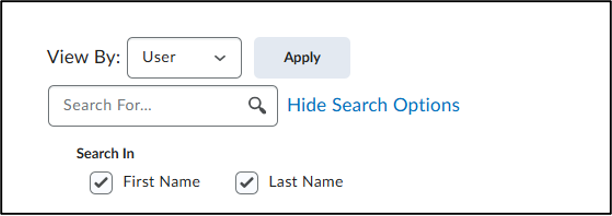
You can also filter based on group, for when your course has multiple seminar groups, for example. To do so, you can edit the search options:
- Next to View By, you’ll find a drop-down menu that currently has “User” selected. Click on it and select “Groups”.
- Right next to that menu, click ‘Apply’
- Now, next to “Groups”, click on the drop-down menu and select the group you want to take attendance for, and again, click ‘Apply’
- Once you’ve assigned the correct status to all of the students, click ‘save’ in the bottom left corner, then click ‘close’.
Important to know
It is not possible in Brightspace to connect the attendance tool to the gradebook. If you want attendance to count toward the final grade, you have to create a grade item, and fill in the final attendance percentages manually.
It is also not possible for students to keep track of their attendance themselves via the attendance tool.
If you want attendance to count as a grade in the gradebook or if you want the students to track their attendance themselves, you can also track attendance via quizzes. This takes a little more time and effort to set up, but will save you the trouble of tracking attendance in class yourself and manually entering the percentages into the gradebook.
Tracking attendance via quizzes
To track attendance via quizzes, it is helpful to first create a category for all of your attendance quizzes in the gradebook. Follow the steps in this manual to create a grade category for attendance.
Next, it is helpful to create a category for your attendance quizzes in the quiz tool.
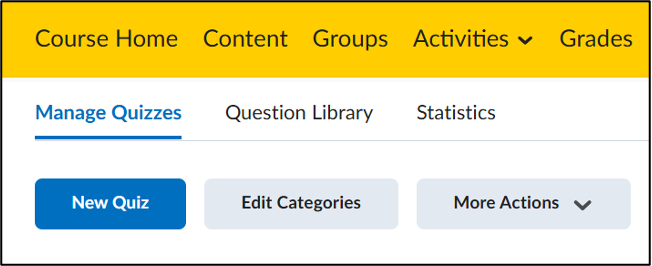
- Click on ‘activities’ in the yellow toolbar, then click ‘quizzes’
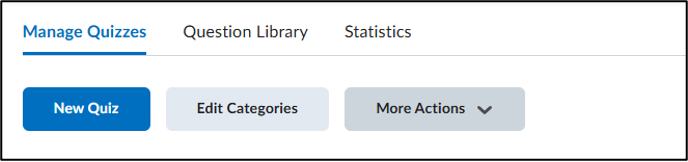
- To create a category, click ‘edit categories’
- In the next window, click ‘add category’ and give your category a name. Click ‘save and close’
Next, it is useful to create a question in the question library, so you don’t have to manually make the question for every seminar.
- Under the yellow toolbar, click ‘Question Library’
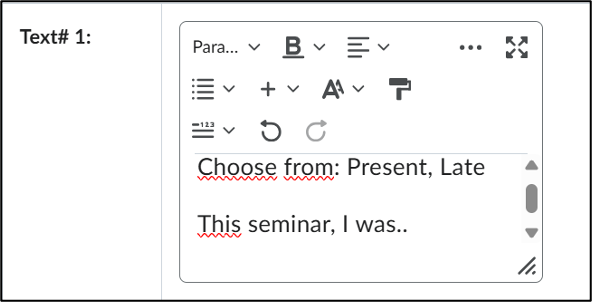
- In the question library, click ‘New’ and ‘Fill in the Blanks Question FIB’. For this example, the goal is to replicate the attendance scheme in the example above.
- Give your question a title, e.g. ‘attendance’, and add scroll down. Add your question to the textbox next to ‘Text#1’, like in the example below.
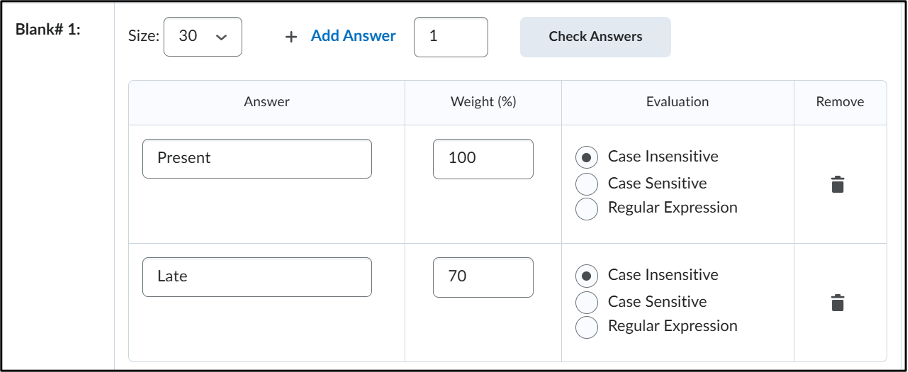
- Next, add the answer options to ‘Blank# 1’.
- Since you have multiple answer options, you first add another answer box by clicking ‘Add Answer’
- Then, add your answer options and their corresponding weights.
- Since this is all we need, delete ‘Text# 2’ by clicking the trashcan icon on the right side. Scroll down and click ‘save’.
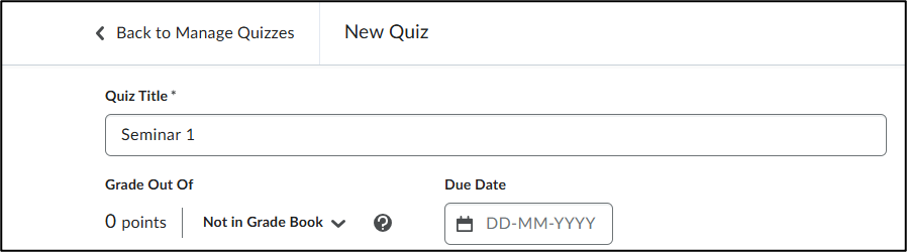
- Now, go back to the ‘Manage Quizzes’ page and click ‘new quiz’.
- Give your quiz a title, e.g. ‘Seminar 1’.
- After this, add the quiz to the gradebook by clicking ‘not in gradebook’
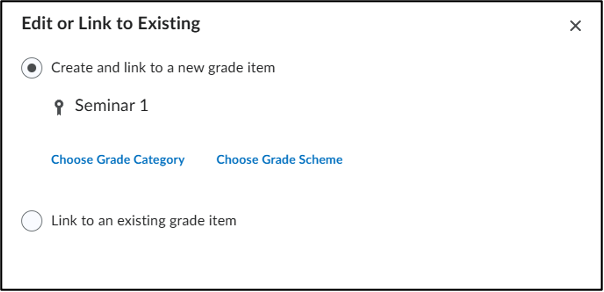
- Then from the dropdown menu click ‘Edit or Link to Existing’
- In the popup window click ‘Choose Grade Category’
- In the dropdown menu select your attendance category.
- Click ‘OK’ and enter the amount of points you want to grade out of.
Now we want to add the quiz to the quiz category, which can be done by:
- Clicking ‘Attempts & Completion’
- Here you’ll find ‘Category’ with a dropdown menu. Select your attendance category from this menu.
You can plan when the quiz will be available for students under the tab ‘Availability Dates & Conditions’. After selecting a date under ‘Start Date’ and ‘End Date’, you can also add the times from and until the quiz should be available, e.g. the duration of the seminar in question.
To keep students from updating their attendance status from home, you can set IP-ranges, so only students connected to UU networks can open the quiz.
- Navigate back to the ‘Availabilty Dates & Conditions’ tab and scroll down.
- Click ‘Manage IP Restrictions’
In the pop-up, you can enter multiple IP ranges. The ranges are:
- Utrecht University network for students: 145.107.64.0 – 145.107.103.255
- Utrecht University network for teachers: 145.107.128.0-145.107.159.255
- USP for cabled internet and VPN: 131.211.0.0-131.211.255.255
It is important to add all three of these ranges, because some of your students may also work at the university or be connected via cable. These ranges may be subject to change in the future.
- Click ‘+ IP Range’ until you have enough slots for the ranges you’re entering
- Copy the ranges into the textboxes and click ‘Save’
OR
To keep students from updating their attendance status from home, you can set a password to share with the students present in class.
- Navigate back to the ‘Availability Dates & Conditions’ tab and scroll down.
- Here you’ll see ‘Password’ and a textbox. Simply enter the password you wish to use for this seminar, but be sure to choose a different password for each seminar.
Finally, we add a question.

- Since you’ve already prepared the question, click ‘Add Existing’ and ‘Browse Question Library’
- Scroll down until you find your attendance question, select by clicking the checkbox on the left
- Click ‘Import’ in the left bottom corner.
- Finally, click ‘Save and Close’ in the bottom left corner.
To copy the quiz for future seminars:
- Navigate to the ‘Manage Quizzes’ page.
- Click the downward arrow right next to the blue title of the quiz you want to copy, and click ‘copy’.
- Now edit the title, availability dates and password, add the quiz to the gradebook, and click ‘save’ and close in the bottom corner.