
Create an announcement
This article explains how to create an ‘Announcement’ and how to link a ‘Release Condition’ to an Announcement.
This page contains information about:
- Announcements homepage
- Create a new Announcement
- Copy an Announcement within a course or to another course
- Add Release Conditions to an Announcement
‘Announcements’ in Brightspace allow you to easily and quickly inform students about important information regarding the course. Announcements can be used to welcome students, notify them about important deadlines, or announce that certain course materials have been added.
Features include:
- Personalize announcements with video or audio messages.
- Decide from when, for how long, and for whom the announcements are visible.
- Add an image to an announcement.
Note: If no image is added, the default ‘megaphone icon’ will be shown. - Edit or delete announcements.
Announcements can be found on the ‘Course Home’ of the course.
Announcements homepage
The Announcements homepage presents an overview of all created announcements. There are two ways to access this homepage:
- Via Course Home:
- On the course homepage, click under ‘Announcements’ on ‘Show All Announcements’
- Via Course Admin
- On the course homepage, click in the navigation bar on Course Admin > Course Admin.

- On the page, scroll down to the heading ‘Communication’ and click on ‘Announcements’.
- On the course homepage, click in the navigation bar on Course Admin > Course Admin.
Create a new Announcement
There are two ways to create a new announcement:
Via ‘Course Home’
- Go to the ‘Course Home’ of the course where you want to post an announcement.
- Click on ‘Show All Announcements’.
- Click at the top left of the screen on ‘New Announcement’.
Via ‘Course Management’
- Go to the ‘Course Home’ of the course where you want to post an announcement.
- Click in the navigation bar on ‘Course Admin’.
- Scroll down to the heading ‘Communication’ and click on ‘Announcements’.
- Then click at the top left of the screen on ‘New Announcement’.
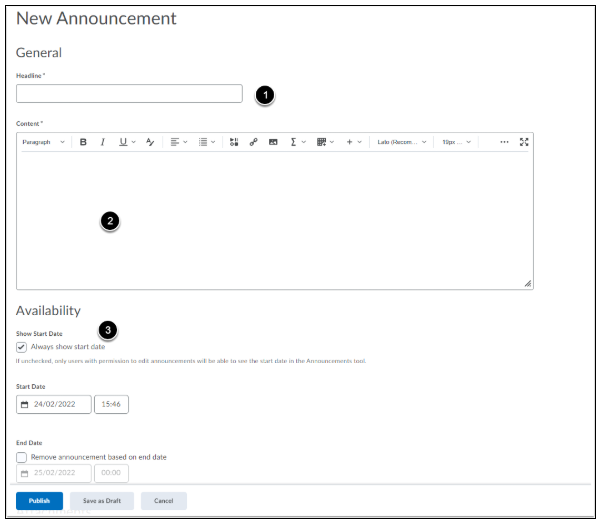
Once the new announcement is created:
- Give the announcement a title under Headline.
- Write the message under Content.
- Indicate under Availability when the announcement will be released;
- The start date is visible to students unless the box for Always show start date is not checked. If that box is not checked, only those who have permission to edit the announcement will know the start date.
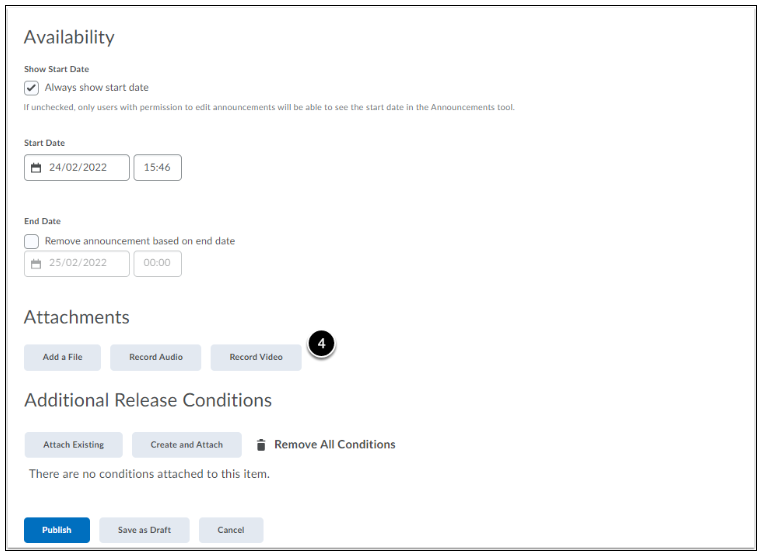
- Add a start date under Start Date. From this day, the announcement is visible to students.
- Click Now in the calendar to publish the announcement immediately.
- Check the box for Remove announcement based on end date if you want the announcement to disappear after a certain time. Enter the end date from when the announcement will no longer be visible.
- You can add a file as an attachment by clicking Add a file under Attachments.
- There is also the option to record audio and video clips, respectively with the Record Audio and Record Video buttons. To use these options, your device must be able to record audio and/or video.
Copy an Announcement within a course or to another course
It is possible to copy an announcement within a course, but also to another course. On the Announcements homepage, click the arrow under the desired announcement and select Copy or Copy to Other Courses.
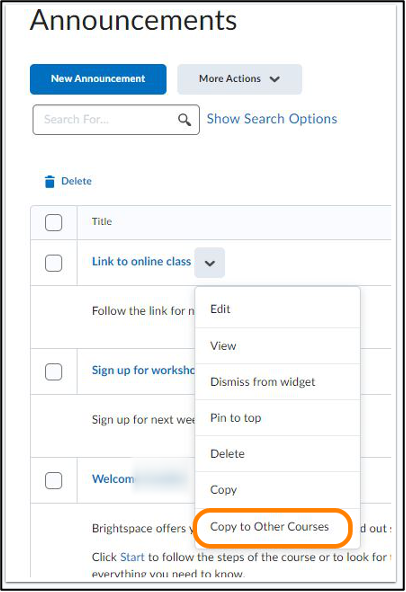
Copy within a course:
- When you click Copy, the announcement appears in the next screen.
- The original title of the announcement is automatically filled in with the text “Copy of” in front.
- You can edit the title.
- Click Publish at the bottom to publish the copy of the announcement.
Copy to another course:
- When you click Copy to Other Courses, you can indicate on the next screen to which course you want to copy the announcement.
- To copy an announcement to another course, you must be enrolled as an instructor in that course.
- Note: Don’t forget to check that the copied announcement is actually published and not just left in the draft version.
Add Release Conditions to an Announcement
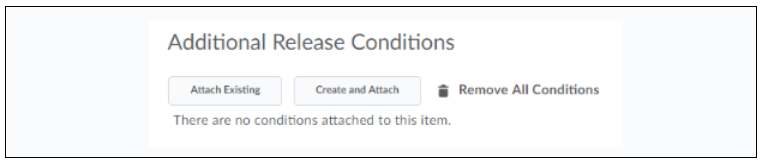
You can add conditions that are required for students before they can view your announcement.
- Click ‘Attach Existing’ to add existing release conditions.
- Click ‘Create and Attach’ to create new release conditions.
- Select one or all release conditions required for students before they can see the announcement in the dropdown menu.
Click ‘Publish’ to publish the announcement or click ‘Save as draft’ if you want to make changes later. You will automatically be redirected to the Announcements homepage.