
Course Builder
In this article, you can read about the use of the Course Builder.
This content of this article consists of:
- Course Builder homepage
- Tree structure
- Build Outline
- Add Content
- Browse Tools
- Information column
Course Builder homepage
- Navigate in the course to Course Admin in your navbar.

- Click on Course Builder under Site Resources.
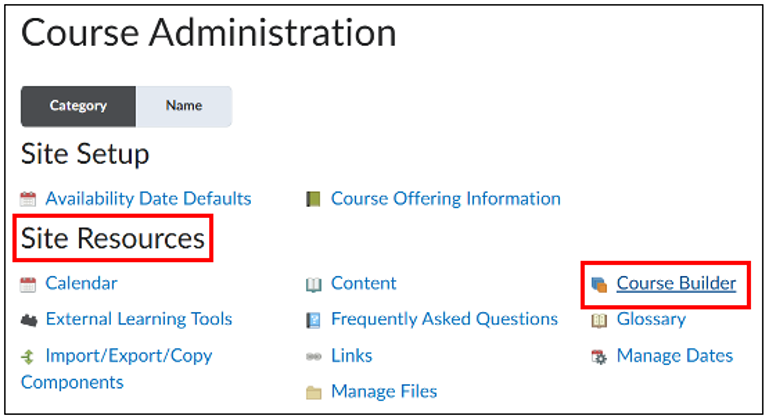
- The Course Builder is useful to create a draft of your course, even if you have not created all activities yet. You can create modules as well as content, links and activities. You can also create empty items (placeholders) to add a frame to your course. The structure you build here can be found under Content (likewise, you will also see everything you add under Content in the Course Builder). Using the Course Builder will provide you with a clear overview of the structure of your course.
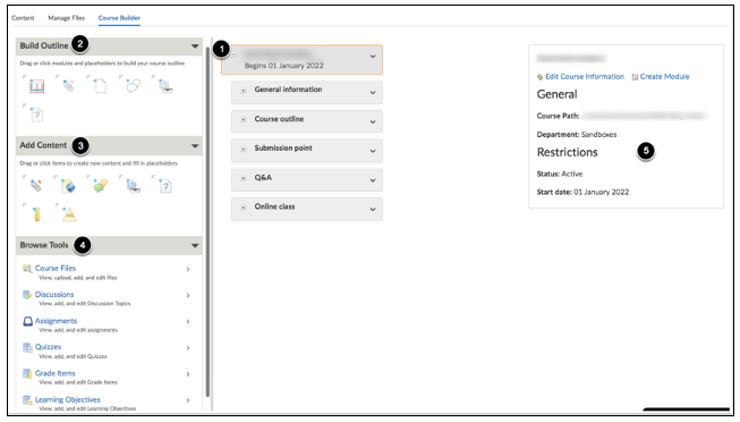
- The Course Builder has three sections. In the center you can find the tree structure of your course. This field will be empty if you have not added anything yet to the course. The grey block at the top of the tree structure showcases your course’s name. Below this you can find the modules and sub-modules.
- Below Build Outline you can create placeholders for modules, links, files, discussions, assignments and quizzes.
- Below Add Content you can create content directly in the preferred location of your course. You can add links, files, discussions, assignments, quizzes, grade items and learning objectives.
- Previously created content can be selected and added via Browse Tools.
- If you select one component of your tree structure, you will find the settings of this component in the menu on the right (for example whether it is published or not). Hover over the various icons in the menu on the left to get more information on the functionality.
Tree structure
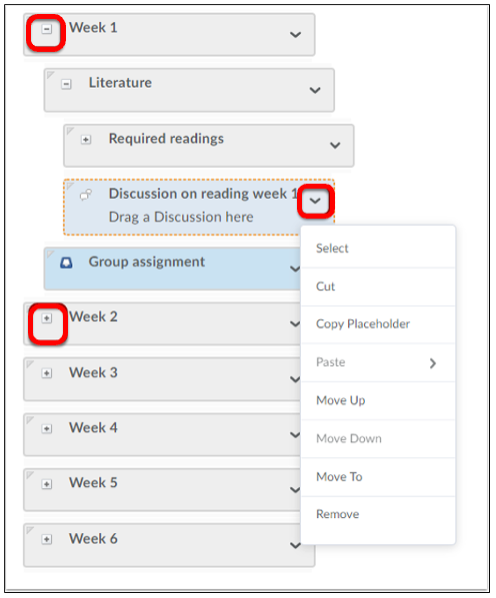
The tree structure in the center column will show the structure of your course.
- The plus sign and minus sign in every section will show the underlying structure.
- The grey sections are modules and sub-modules, the blue sections are the topics within the (sub)modules.
- The light blue sections with a dotted line are placeholders (the example above shows ‘Discussion on reading week 1’ as a placeholder). If the section is a darker blue with an uninterrupted line, it means you have already added content (the example above shows ‘Group assignment’). When a section displays the word Draft, it means the section is set to ‘hidden’.
- Click on the arrow next to a (sub)module, a content section or a placeholder to:
- select the section (Select).
- cut (Cut) or copy (Copy Placeholder) the section in order to paste (Paste) it somewhere else in this or another (sub)module.
- move the section within the (sub)module (Move Up, Move Down) or to move it to another (sub)module (Move To). You can also move each section by first clicking it and then drag it you the desired location.
- remove the section (Remove).
Build Outline
You can easily create the structure of your course with Build Outline without having to fill it with content and activities. It is important to know how you want to structure the course before you start. For example, do you want to create a layout that works with weeks, themes, or something else?
The benefit of creating an empty structure with placeholders is that you can set up one module and then copy it for other purposes.
For example: you want to divide your course into weeks, with each week’s module displaying the same topics, like Literature, Quiz, Discussion Board and Assignments. You can create the module for week 1 using placeholders, and then copy these to week 2, week 3 and so forth.
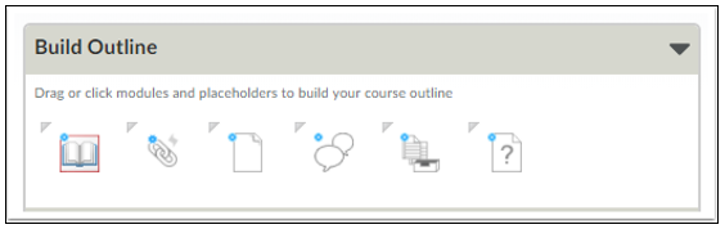
Select one of the icons to add modules, links, files, discussions, assignments or quizzes. This will add the placeholders to the tree structure of your course, leading to structured sections without content. When you click one of the icons, you can choose under which (sub)module you want to place this component. You can also drag a placeholder to the preferred spot in the tree structure.
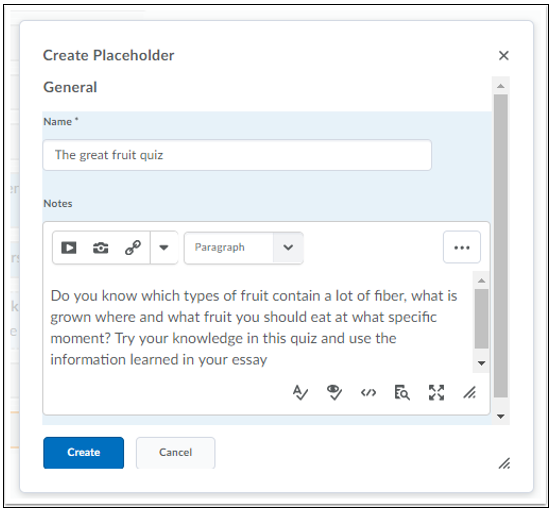
When creating a placeholder you can give it a name and description. Then click Create. Note that Brightspace will automatically assign a title and description based on what you can do with an activity.
Placeholders will not be visible in Content as long as they do not have any content.
Add Content
Below Add Content you can create new content and then place the content in a (sub)module or placeholder.
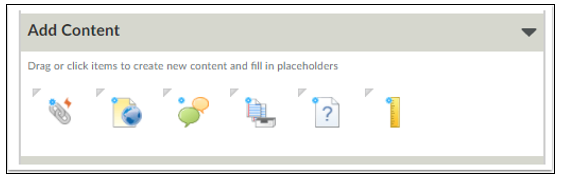
You can click the icons to create a new link, HTML-file, discussion topic, submission folder, quiz or grade item, respectively. You can also drag the icon to a preferred spot within the structure. When you select an icon, the first thing you have to do is choose where in the structure you want to add the icon. Then, you are directed to a screen where you can change the settings. The articles about Content will give you more information on creating files and activities:
Content
You can add content in a placeholder by dragging an icon to the placeholder if the icon and placeholder are similar. Or click on the placeholder and select “New [tooltype]” from the column on the right.
It is easier to create activities in Course Tools and add these to the Course Builder afterwards. This will provide you with more options regarding restrictions and assessment.
Browse Tools
You can add previously created files and activities below Browse Tools.
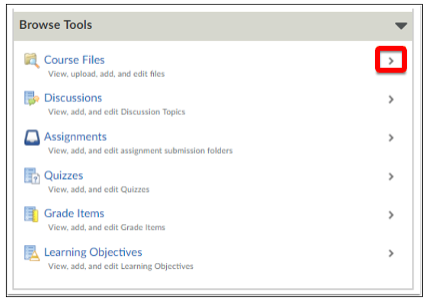
Select the arrow relating to the desired content type.
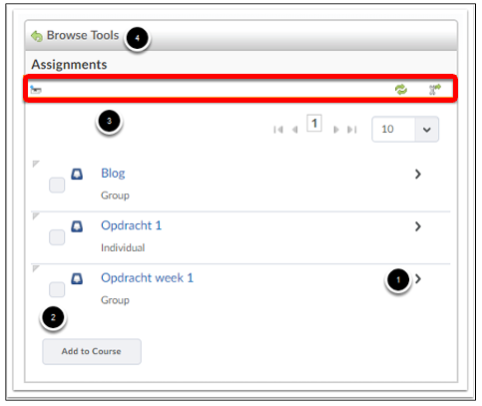
- Click the arrow to display the details of the component.
- Select the desired component and click Add to Course to add the component to the tree structure. Then select where it is that you want to add the component.
- From left to right, the icons will allow you to:
- Create a new file or activity. Note that in Course Files there will be an additional icon that will allow you to upload files from your computer.
- Reload the page (for example if you have created a new file/activity in a different window and this does not show yet).
- Open the Activity page of the concerned component in a new window.
4. Click Browse Tools to return to the browse tools overview.
You will find all the files and documents you have previously created under Course Files. If you have an elaborate file structure, there could be several levels you have to search to find the desired document.
If you use Safari as browser, it is possible that certain items (for example Submissions) cannot be opened due to your browser settings.
Information column
On the right side of the screen you will find an information column that shows the details of the (sub)module or the selected part of the tree structure.
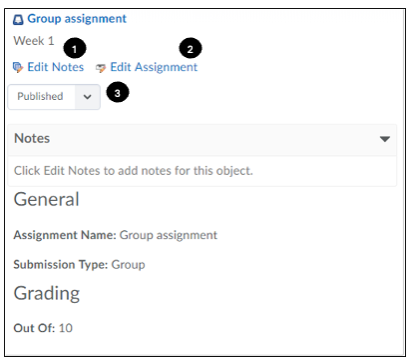
- Click Edit Notes to add or alter notes. These notes are not visible for students, but instead are for your personal use. They can only be read and altered in the Course Builder.
- Select Edit [tooltype] to alter the module or the component. Note that there are limited possibilities here, it is easier to alter the component in the activity or module itself.
- Change the status of the component from Published to Draft (or the other way around).