Set restrictions
At Restrictions you can set up:
- When a survey becomes available (status and data)
- The maximum amount of attempts
- If and which students have special access to the survey
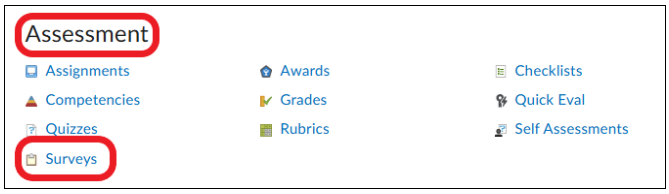
- On the homepage of the course, click on ‘Course Admin’ in the navigation bar.

- In the new screen, click on ‘Surveys’ under ‘Assessment’
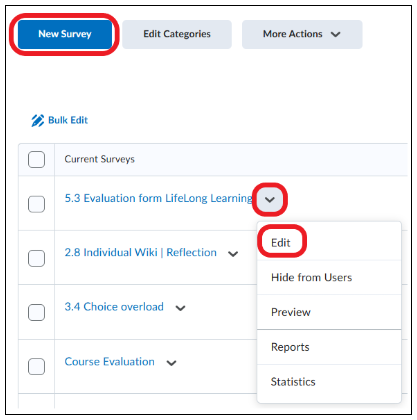
- Click on ‘Edit’ in the dropdown menu next to the survey or create a new survey by clicking on ‘New Survey’.
- In the new screen, click on ‘Restrictions’ next to ‘Properties’

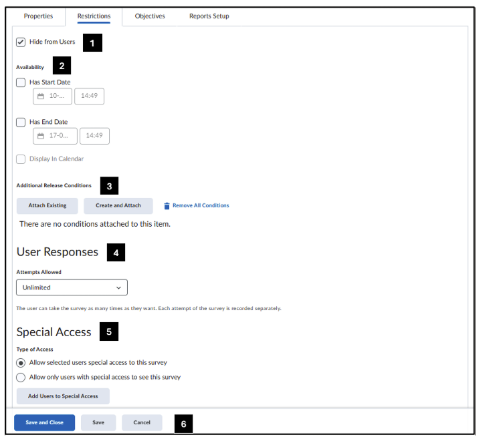
- Tick ‘Hide from Users’ if you want the survey to be invisible to users.
- Below ‘Availability’:
- Has Start Date: decide from which date the survey is visible to users.
- Has End Date: decide until which date the survey is visible to users.
- Tick ‘Calendar’ if you want the survey to appear in the calendar on the specified date.
- Below ‘Additional Release Conditions’:
- Click on ‘Attach Existing’ to add already existing release conditions.
- Click on ‘Create and Attach’ to create new release conditions.
- Click on ‘Remove All Conditions’ to delete all attached release conditions.
- Below ‘User Responses’, decide how many times users are allowed to take the survey:
- Unlimited – The user can take the survey as many times as they like. Brightspace will save each attempt separately.
- Single attempt that is editable – The user can only fill in the survey once but has access to the survey to edit their answers until the end date.
- Limited – The user can only have a limited amount of attempts. Brightspace will save each attempt separately.
- Fill under ‘Number of attempts’ in the amount of attempts each users have.
- Below ‘Special Access’ customise the access of the survey for individual users:
- Allow selected users special access to this survey
- Allow only users with special access to see this survey
- Add users with special access by clicking on ‘Add Users to Special Access’
- Click on ‘Save and close’ to save the restrictions to the survey.